 Hyundai Equus: Smart Key Antenna Repair procedures
Second generation VI (2009ŌĆō2026) / Hyundai Equus VI 2009-2026 Service Manual / Body Electrical System / Smart Key System / Smart Key Antenna Repair procedures
Hyundai Equus: Smart Key Antenna Repair procedures
Second generation VI (2009ŌĆō2026) / Hyundai Equus VI 2009-2026 Service Manual / Body Electrical System / Smart Key System / Smart Key Antenna Repair procedures
Second generation VI (2009ŌĆō2026) / Hyundai Equus VI 2009-2026 Service Manual / Body Electrical System / Smart Key System / Smart Key Antenna Repair procedures
| Removal |
Interior 1 Antenna
| 1. |
Disconnect the negative (-) battery terminal. |
| 2. |
Remove the AVN head unit.
(Refer to Premium AVN System - "AVN Head Unit") |
| 3. |
Remove the interior 1 antenna (A) after disconnecting the connector and loosening the mounting nuts.
|
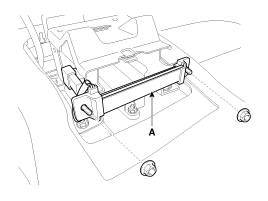
Interior 2 Antenna
| 1. |
Disconnect the negative (-) battery terminal. |
| 2. |
Remove the floor console assembly.
(Refer to Body - "Floor Console Assembly") |
| 3. |
Remove the interior 2 antenna (A) after disconnecting the connector and loosening the mounting nuts.
|
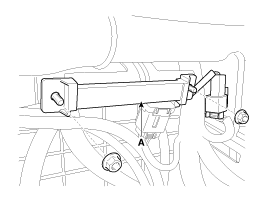
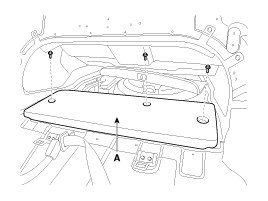
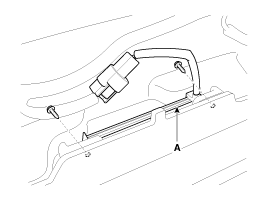
Interior 3 Antenna
| 1. |
Disconnect the negative (-) battery terminal. |
| 2. |
Remove the rear seat.
(Refer to Body - "Rear Seat Assembly") |
| 3. |
Remove the rear package tray trim.
(Refer to Body - "Rear Package Tray Trim") |
| 4. |
Remove the interior 3 antenna (A) after disconnecting the connector and loosening the mounting nuts.
|
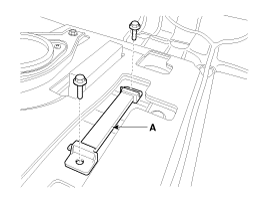
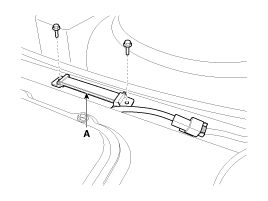
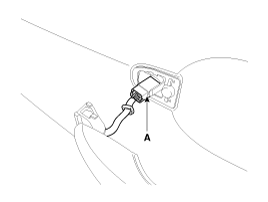
Trunk Antenna
| 1. |
Disconnect the negative (-) battery terminal. |
| 2. |
Remove the trunk carpet (A).
|
| 3. |
Remove the trunk antenna (A) after disconnecting the connector and loosening the mounting nuts.
|
Exterior Bumper Antenna
| 1. |
Disconnect the negative (-) battery terminal. |
| 2. |
Remove the rear bumper cover.
(Refer to Body - "Rear Bumper Cover") |
| 3. |
Remove the external bumper antenna (A) after loosening the mounting screws.
|
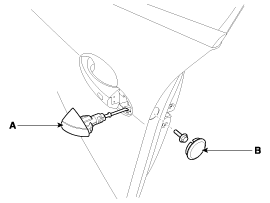
Door Outside Handle
| 1. |
Disconnect the negative (-) battery terminal. |
| 2. |
Remove the door outside handle cover (A) after seperating the plug hole (B) from the door and loosening the mounting bolt.
|
| 3. |
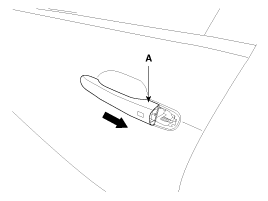
Remove the outside handle (A) by sliding it rearward.
|
| 4. |
Disconnect the front door outside handle connector (A).
|
| Installation |
Interior 1 Antenna
| 1. |
Install the interior 1 antenna after connecting the connector. |
| 2. |
Install the AVN head unit. |
| 3. |
Connect the negative (-) battery terminal. |
Interior 2 Antenna
| 1. |
Install the interior 2 antenna after connecting the connector. |
| 2. |
Install the floor console assembly. |
| 3. |
Connect the negative (-) battery terminal. |
Interior 3 Antenna
| 1. |
Install the interior 3 antenna after connecting the connector. |
| 2. |
Install the rear package tray trim. |
| 3. |
Install the rear seat. |
| 4. |
Connect the negative (-) battery terminal. |
Trunk Antenna
| 1. |
Install the trunk antenna after connecting the connector. |
| 2. |
Install the trunk carpet. |
| 3. |
Connect the negative (-) battery terminal. |
Exterior Bumper Antenna
| 1. |
Install the bumper antenna after connecting the connector. |
| 2. |
Install the rear bumper cover. |
| 3. |
Connect the negative (-) battery terminal. |
Door Outside Handle
| 1. |
Install the door outside handle after connecting the connector. |
| 2. |
Install the door trim. |
| 3. |
Connect the negative (-) battery terminal. |
 Smart Key Unit Repair procedures
Removal
Smart Key Unit
1.
Disconnect the negative (-) battery terminal.
2.
Remove the crash pad lower panel after loosening the mounting screws.
(Refer to Body - "Crash Pad Lower Panel")
...
 Smart Key Receiver Components and Components Location
Components
...
See also:
Fuses
A vehicleŌĆÖs electrical system is protected from electrical overload damage by
fuses.
This vehicle has 4 fuse panels, two located in the driverŌĆÖs side and passengerŌĆÖs
side panel bolster, t ...
Brake fluid
Check brake fluid level in the brake fluid reservoir. The level should be between
ŌĆ£MINŌĆØ and ŌĆ£MAXŌĆØ marks on the side of the reservoir. Use only hydraulic brake fluid
conforming to DOT 3 or ...
Pre-active Seat Belt (PSB) Description and Operation
Description
Pre-active Seat Belt (PSB) guarantees initial restraint
performance by winding the seat belt right before a crash or dangerous
condition and enhances the effects of the seat belt pr ...
Categories
Hyundai Equus Manuals

® 2011-2026 Copyright www.heqmanual.com