 Hyundai Equus: Windshield Wiper-Washer Switch Repair procedures
Second generation VI (2009–2026) / Hyundai Equus VI 2009-2026 Service Manual / Body Electrical System / Windshield Wiper/Washer / Windshield Wiper-Washer Switch Repair procedures
Second generation VI (2009–2026) / Hyundai Equus VI 2009-2026 Service Manual / Body Electrical System / Windshield Wiper/Washer / Windshield Wiper-Washer Switch Repair procedures
| Removal |
| 1. |
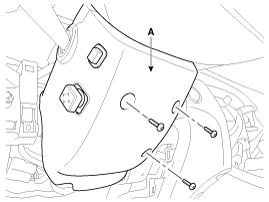
Remove the steering column upper and lower shrouds after loosening screws.
|
| 2. |
Disconnect the multifunction switch connector (A).
|
| 3. |
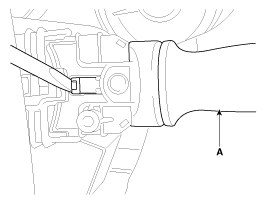
Remove the wiper & washer switch (A) by pushing the lock pin.
|
| 4. |
Remove the clock spring.
(Refer to Restraint - "Driver Airbag (DAB) Module and Clock Spring")
|
| 5. |
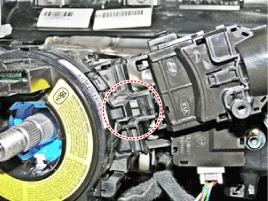
Loosen the screws (2EA) from the multifunction switch assembly (A).
|
| Installation |
| 1. |
Install the multifunction switch after connecting the connector. |
| 2. |
Install the clock spring.
|
| 3. |
Install the steering column upper and lower shrouds. |
| 4. |
Install the steering wheel.
|
| Inspection |
| 1. |
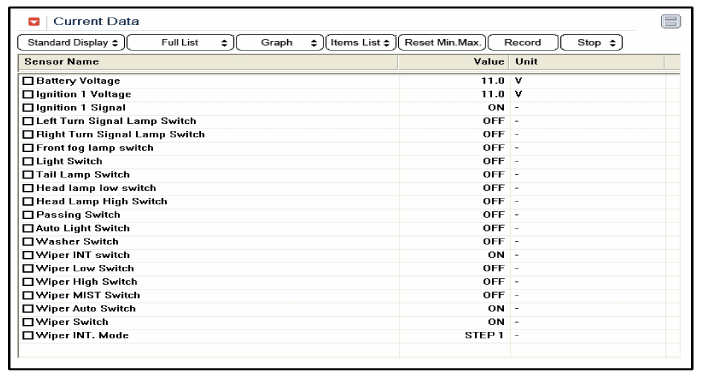
Check IPM input/output specification of windshield
wiper/washer switch using the GDS. If the specification is abnormal,
replace the windshield wiper/washer switch module. |
| 2. |
Select option "Input/output monitoring".
|
 Components and Components Location
Component Location
1. Windshield wiper arm & blade2. Wiper & washer switch3. Windshield washer hose4. Windshield wiper motor & linkage5. Washer motor6. Washer reservoir
...
 Front Wiper Motor Components and Components Location
Components
1. Nut cap2. Nut3. Wiper arm4. Wiper blade5. Cowl top cover braket6. Cowl top cover7. Washer bolt8. Wiper motor & linkage assembly
...
See also:
Damper Clutch Control Solenoid Valve Specifications
Specifications
Damper Clutch Control VFS
x Control type : Normal low type
Control Pressure kpa (kgf/cmx, psi)0~500.14 (0~5.1,0~72.54)Current value(mA)0~850 Internal resistance( ...
Compressor Schematic Diagrams
Circuit diagram
1.
Air compressor connector
[Motor power connector (A)][Exhaust valve connector (B)][Temperature sensor connector (C)]
2.
Air compressor terminal function
[Motor power]
...
Evaporator Temperature Sensor Repair procedures
Inspection
1.
Turn the ignition switch OFF.
2.
Disconnect the evaporator temperature sensor connector.
3.
Measure the resistance between terminal “+” and “-” of the evaporator temp ...
Categories
Hyundai Equus Manuals
© 2011-2026 Copyright www.heqmanual.com


