 Hyundai Equus: Repair procedures
| Removal |
Front Blind Camera
| 1. |
Remove the front bumper cover.
(Refer to Body - "Front Bumper") |
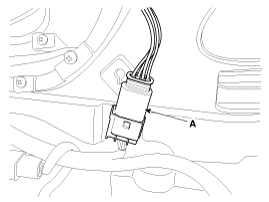
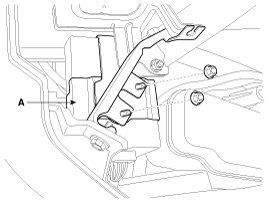
| 2. |
Remove the front blind camera (B) after removing the connector (A) and screws (4EA).
|
Back View Camera
| 1. |
Remove the screws, clip and trunk lid trim in the trunk.
(Refer to Body - "Trunk Lid") |
| 2. |
Remove the trunk lid panel. |
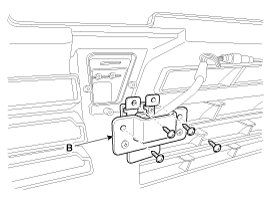
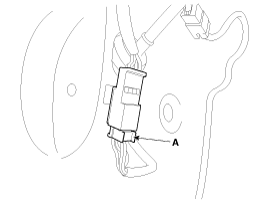
| 3. |
Remove the back view camera (B) after removing the connector (A) and screws (2EA).
|

Front Back View Camera Unit
| 1. |
Disconnect the negative (-) battery terminal. |
| 2. |
Remove glove box housing (A).
(Refer to Body - "Crash Pad")
|
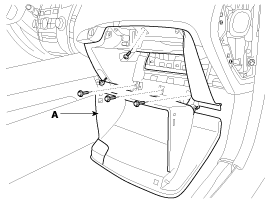
| 3. |
Disconnect the glove box housing connector (A).
|

| 4. |
Remove the DIS head unit.
(Refer to Body - "DIS System") |
| 5. |
Remove the USB interface unit. |
| 6. |
Remove the front back view camera unit (A) after removing the nuts (2EA) and connector.
|
| Installation |
Front blind camera
| 1. |
Install the front blind camera. |
| 2. |
Install the front bumper cover. |
Back view camera
| 1. |
Install the back view camera. |
| 2. |
Install the trunk lid panel and trim. |
Front Back view camera unit
| 1. |
Install the front back view camera unit. |
| 2. |
Install the USB interface unit |
| 3. |
Install the DIS head unit. |
| 4. |
Install the glove box and housing. |
 Description and Operation
Description
Front blind camera is a supplemental system that shows blind spot in front of the vehicle through the AV monitor.
The front blind camera will operate when you push the button
and shi ...

See also:
Troubleshooting
Troubleshooting
SymptomSuspect AreaRemedy (Refer to page)Water leaks from sunroofDirt accumulated in drain tubeClear dirt inside of drainClogged drain tubeBlow air into drain to remove dirtBroken ...
Sunroof Sunshade Repair procedures
Replacement
1.
Remove the sunroof assembly.
(Refer to Sunroof - "Sunroof Assembly")
2.
After loosening the mounting screw, then remove the drip link (A) and sunshade stopper (B).
3.
Remov ...
Auto Head lamp leveling Unit Description and Operation
Description
According to driving environment and loading state of
vehicle, head lamp lighting direction is changed to keep the driver's
visibility range and to protect the driver's vision from ...
Categories
Hyundai Equus Manuals

© 2011-2026 Copyright www.heqmanual.com