 Hyundai Equus: Radiator Repair procedures
Second generation VI (2009–2026) / Hyundai Equus VI 2009-2026 Service Manual / Engine Mechanical System / Cooling System / Radiator Repair procedures
Second generation VI (2009–2026) / Hyundai Equus VI 2009-2026 Service Manual / Engine Mechanical System / Cooling System / Radiator Repair procedures
| Inspection |
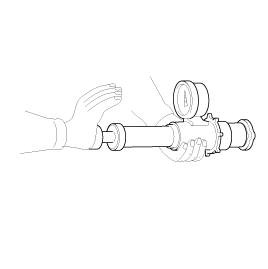
Radiator Cap Testing
| 1. |
Remove the radiator cap, wet its seal with engine coolant, then install it to pressure tester.
|
| 2. |
Apply a pressure of 93 ~ 123kPa (0.95 ~ 1.25kgf/cmx, 14 ~ 19psi). |
| 3. |
Check for a drop in pressure. |
| 4. |
If the pressure drops, replace the cap. |
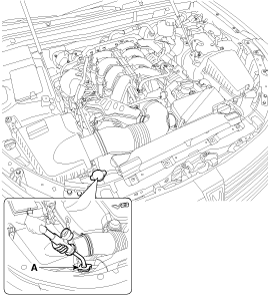
Radiator Leakage Test
| 1. |
Wait until engine is cool, then carefully remove the radiator
cap and fill the radiator with engine coolant, then install a pressure
tester (A) on it.
|
| 2. |
Apply a pressure of 93 ~ 123kPa (0.95 ~ 1.25kgf/cmx, 14 ~ 19psi). |
| 3. |
Inspect for engine coolant leaks and a drop in pressure. |
| 4. |
If the pressure drops, check hoses, the radiator and the
water pump for leakage. If there is no leakage, inspect the heater core,
the cylinder block and the cylinder head. |
| 5. |
Remove the tester and reinstall the radiator cap.
|
| Removal |
System is under high pressure when the engine is hot. To
avoid danger of releasing scalding engine coolant, remove the cap only
when the engine is cool. |
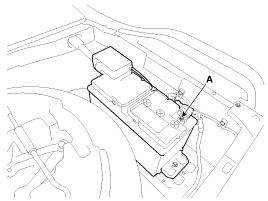
| 1. |
Disconnect the negative terminal (A) from the battery.
|
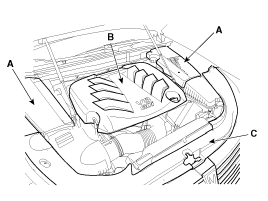
| 2. |
Remove the engine room cover (A), engine cover (B) and radiator grill upper cover (C).
|
| 3. |
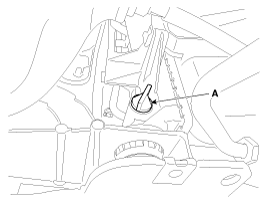
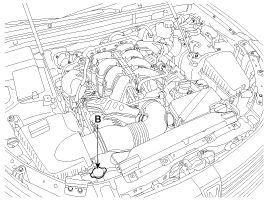
Loosen the drain plug (A) and drain the engine coolant. Remove the radiator cap (B) to speed draining.
|
| 4. |
Remove the air cleaner assembly.
|
| 5. |
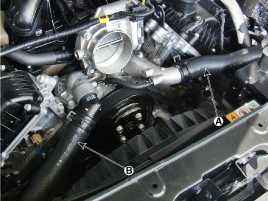
Disconnect the radiator upper hose (A) and lower hose (B).
|
| 6. |
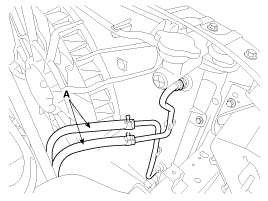
Disconnect the ATF cooler hoses (A).
|
| 7. |
Disconnect the fan motor connector (A). If necessary, loosen the fuse box fixing bolt for your convenience.
|
| 8. |
Remove the radiator mounting brackets (A). |
| 9. |
Remove the radiator & condenser mounting bolts (B).
|
| 10. |
Remove the radiator & cooling fan assembly from the vehicle. |
| 11. |
Installation is reverse order of removal.
Fill the radiator with coolant and check for leaks. |
 Radiator Components and Components Location
Components
1. Cooling fan assembly2. Radiator lower hose3. Radiator upper hose4. Coolant reservoir tank5. Radiator6. Mounting insulator7. Mounting bracket
...
 Water pump Components and Components Location
Components
1. Drive belt2. Drive belt tensioner3. Drive belt idler4. Water pump pulley5. Water pump6. Water pump gasket
...
See also:
Front Air Strut Assembly Schematic Diagrams
Circuit Diagram
1.
Front air strut connector
2.
Front air terminal function
TerminalFunction1Variable damper (-)2Variable damper (+)
3.
Circuit diagram ...
Description and Operation
Description
EHPS uses an electromotor to assist you in steering the
vehicle. It senses the vehicle speed and road condition.If the engine is
off or if the power steering system becomes inoperat ...
Advanced vehicle safety management (AVSM) (If equipped)
AVSM detects the distance from the vehicle ahead with the sensor, to warn you
before collision and protect you in certain hazardous situations by using warning
message, warning sound and seat belt ...
Categories
Hyundai Equus Manuals
© 2011-2026 Copyright www.heqmanual.com

