 Hyundai Equus: Power Trunk Module Drive Unit Repair procedures
Second generation VI (2009–2026) / Hyundai Equus VI 2009-2026 Service Manual / Body Electrical System / Power Trunk Module / Power Trunk Module Drive Unit Repair procedures
Hyundai Equus: Power Trunk Module Drive Unit Repair procedures
Second generation VI (2009–2026) / Hyundai Equus VI 2009-2026 Service Manual / Body Electrical System / Power Trunk Module / Power Trunk Module Drive Unit Repair procedures
Second generation VI (2009–2026) / Hyundai Equus VI 2009-2026 Service Manual / Body Electrical System / Power Trunk Module / Power Trunk Module Drive Unit Repair procedures
| Removal |
|

| 1. |
Disconnect the negative (-) battery terminal. |
| 2. |
Remove the left trunk trim in the trunk. (Refer to the Body group - "Trunk") |
| 3. |
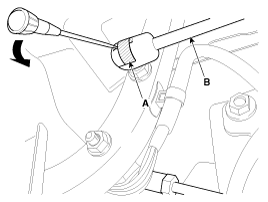
Remove the power trunk connecting rod (B) after removing the push rod pin (A).
|

| 4. |
Remove the power trunk module & drive unit (A) after removing the bolts, nut and connector.
|
| Installation |
| 1. |
Install the power trunk module & drive unit.
|
| 2. |
Install the push rod to the ball joint. |
| 3. |
Connect the connector (18P). |
| 4. |
Install the left trunk trim. |
| 5. |
Connect the negative (-) battery terminal and check the power trunk module correctly.
|

 Power Trunk Module Drive Unit Schematic Diagrams
Circuit Diagram
...
 Power Latch Repair procedures
Removal
1.
Disconnect the negative (-) battery terminal.
2.
Remove the trunk trim in the trunk.
(Refer to Body - "Trunk")
3.
Remove the power latch (A) after removing the bolts (2EA) and ...
See also:
Vanity mirror lamp
Opening the lid of the vanity mirror will automatically turn on the mirror light.
CAUTION
To prevent unnecessary charging system drain, close the vanity mirror cover
after using the mirror. ...
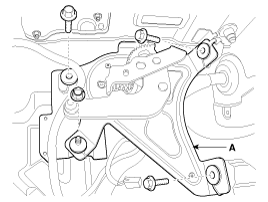
Front Lower Arm Repair procedures
Removal
Remove the lateral arm.
1.
Remove the front wheel and tire (A) from front hub .
Tightening torque:
88.3 ~ 107.9 N.m (9.0 ~ 11.0 kgf.m, 65.1 ~ 79.6 lb-ft)
• ...
Fuel Tank Air Filter Repair procedures
Replacement
1.
Turn the ignition switch OFF and disconnect the negative (-) battery cable.
2.
Remove the service cover (A).
3.
Disconnect the canister close valve connector (A).
4.
Di ...
Categories
Hyundai Equus Manuals

© 2011-2026 Copyright www.heqmanual.com