 Hyundai Equus: Fuel Line Repair procedures
Second generation VI (2009–2026) / Hyundai Equus VI 2009-2026 Service Manual / Engine Control/Fuel System / Fuel Delivery System / Fuel Line Repair procedures
Hyundai Equus: Fuel Line Repair procedures
Second generation VI (2009–2026) / Hyundai Equus VI 2009-2026 Service Manual / Engine Control/Fuel System / Fuel Delivery System / Fuel Line Repair procedures
Second generation VI (2009–2026) / Hyundai Equus VI 2009-2026 Service Manual / Engine Control/Fuel System / Fuel Delivery System / Fuel Line Repair procedures
| Removal |
| 1. |
Turn ignition switch OFF and disconnect the negative (-)battery cable. |
| 2. |
Release the residual pressure in fuel line.
(Refer to Fuel Delivery System - "Release Residual Pressure in Fuel Line") |
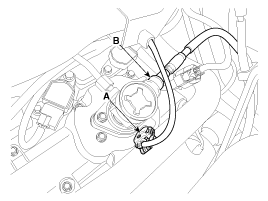
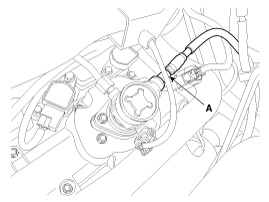
| 3. |
Disconnect the fuel pressure control valve connector (A) and the fuel feed tube quick-connector (B).
|
| 4. |
Disconnect the vapor hose (A) which is connected from the PCSV.
|

| 5. |
Remove the fuel tank.
(Refer to Fuel Delivery System - “Fuel Tank”) |
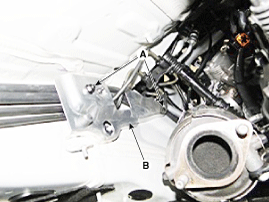
| 6. |
Remove the mounting nuts (A) and then, remove the fuel & brake line protector (B).
|
| 7. |
Remove the mounting nuts (A). |
| 8. |
Remove the vapor tube line fixing clip (B) by using a common driver.
|
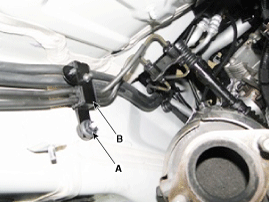
| 9. |
Remove the mounting bolt. |
| 10. |
Remove the vapor tube and fuel tube line fixing clip (A) by using a common driver.
|
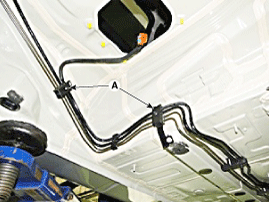
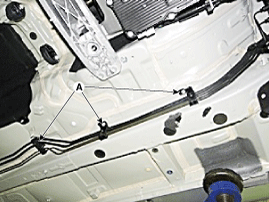
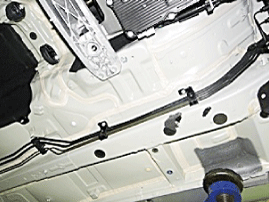
| 11. |
Remove the fuel line (A).
|

| Installation |
| 1. |
Install in the reverse order of removal.
|
| Inspection |
| 1. |
Start the engine. |
| 2. |
Check the fuel feed line (A) installation state and fuel leakage state.
|
| 3. |
Folding the rear seat cushion. |
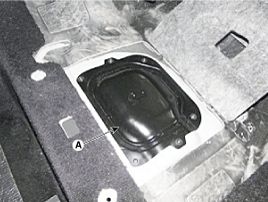
| 4. |
Remove the fuel pump service cover (A) after loosening the screws.
|
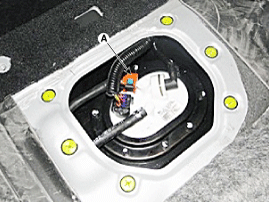
| 5. |
Check the fuel feed quick-connector (A) installation state and fuel leakage state.
|
| 6. |
Lift the vehicle. |
| 7. |
Check the fuel leakage state.
|
| 8. |
Replace the fuel line after checking the abnormal fuel line.
(Refer to Fuel Delivery System - "Fuel Line") |
 Fuel Pressure Sensor (FPS) Repair procedures
Inspection
1.
Connect the GDS on the Data Link Connector (DLC).
2.
Check the output voltage of fuel pressure sensor (FPS).
Specification: Refer to “Specification”
Removal
1.
Tu ...
 Filler-Neck Assembly Repair procedures
Removal
1.
Disconnect the fuel filler hose (A) and the leveling hose (B).
2.
Disconnect the vapor hose quick-connector (A) after removing the trunk luggage trim.
3.
Remove the rear-LH whee ...
See also:
Panic Button
Press the Panic button (4) for more than one second. The horn sounds and hazard
warning lights flash for about 30 seconds.
To cancel the panic mode, press any button on the Smart Key. ...
Mode Control Actuator Description and Operation
Description
The mode control actuator is located at the heater unit.
It adjusts the position of the mode door by operating the
mode control actuator based on the signal of the A/C control unit. ...
Canister Close Valve (CCV) Schematic Diagrams
Circuit Diagram
...
Categories
Hyundai Equus Manuals

© 2011-2026 Copyright www.heqmanual.com