 Hyundai Equus: G Sensor Repair procedures
Second generation VI (2009–2026) / Hyundai Equus VI 2009-2026 Service Manual / Suspension System / Air Suspension System / G Sensor Repair procedures
Hyundai Equus: G Sensor Repair procedures
Second generation VI (2009–2026) / Hyundai Equus VI 2009-2026 Service Manual / Suspension System / Air Suspension System / G Sensor Repair procedures
Second generation VI (2009–2026) / Hyundai Equus VI 2009-2026 Service Manual / Suspension System / Air Suspension System / G Sensor Repair procedures
| Removal |
|

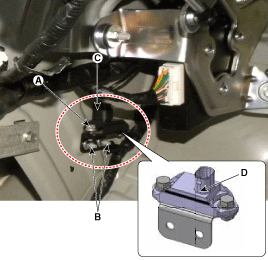
G-sensor FL
| 1. |
Remove the front bumper.
(Refer to Body- "Front Bumper Cover") |
| 2. |
Remove the left head lamp.
(Refer to Body Electrical System- "Head Lamps") |
| 3. |
Disconnect the connector (B) and nut (A-2ea) remove the G-sensor (C).
|
| 4. |
Install in the reverse order of removal. |
G-sensor FR
| 1. |
Remove the air cleaner assembly.
(Refer to Engine Mechanical System - "Exhaust Manifold") |
| 2. |
Disconnect the connector (B) and nut (A-2ea) remove the G-sensor (C).
|
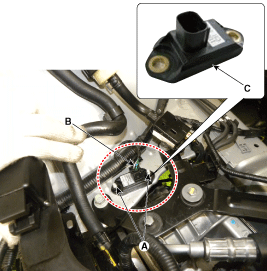
| 3. |
Install in the reverse order of removal. |
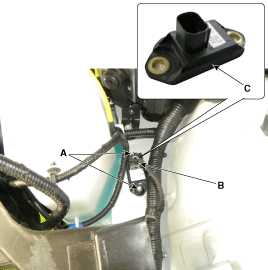
G-sensor RL
| 1. |
Remove the trunk trim.
(Refer to Body - "Trunk Trim") |
| 2. |
Remove the luggage side trim on the left.
(Refer to Body - "Trunk Trim") |
| 3. |
Loosen the bolt (A-2ea) and bracket nut (B-2ea) and disconnect connector (C) remove the G-sensor (D).
|
| 4. |
Install in the reverse order of removal. |
 G Sensor Schematic Diagrams
Circuit diagram
1.
G-sensor connector
2.
G-sensor terminal function
NoFunction1Signal2Ground3Power(5V)
3.
Circuit diagram ...
 Lower Arm Repair procedures
Removal
[Front Lower Arm]
Replacement the lateral arm
1.
Removal the front wheel & tire.
Tightening torque :
90.0 ~ 110.0 N.m(9.0 ~ 11.0 kgf.m, 65.0 ~ 80.0 lb-ft)
2.
Disconnect ...
See also:
Trailing Arm Repair procedures
Removal
1.
Remove the rear wheel and tire (A) from rear hub .
Tightening torque:
88.3 ~ 107.9 N.m (9.0 ~ 11.0 kgf.m, 65.1 ~ 79.6 lb-ft)
•
Be careful not to damage ...
Do not let ice and snow accumulate underneath
Under some conditions, snow and ice can build up under the fenders and interfere
with the steering. When driving in severe winter conditions where this may happen,
you should periodically check un ...
Power Steering Gear Box Components and Components Location
Components
1. Tie rod end2. Lock nut3. Bellows Clip4. Bellows5. Bellows band6. Steering gear box
...
Categories
Hyundai Equus Manuals

© 2011-2026 Copyright www.heqmanual.com