 Hyundai Equus: Relay Box (Engine Compartment) Repair procedures
Second generation VI (2009–2026) / Hyundai Equus VI 2009-2026 Service Manual / Body Electrical System / Fuses And Relays / Relay Box (Engine Compartment) Repair procedures
Hyundai Equus: Relay Box (Engine Compartment) Repair procedures
Second generation VI (2009–2026) / Hyundai Equus VI 2009-2026 Service Manual / Body Electrical System / Fuses And Relays / Relay Box (Engine Compartment) Repair procedures
Second generation VI (2009–2026) / Hyundai Equus VI 2009-2026 Service Manual / Body Electrical System / Fuses And Relays / Relay Box (Engine Compartment) Repair procedures
| Inspection |
| 1. |
Disconnect the negative (-) battery terminal. |
| 2. |
Pull out the relay from the engine compartment relay box. |
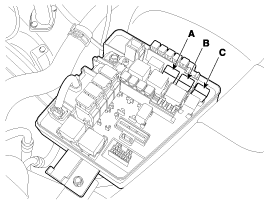
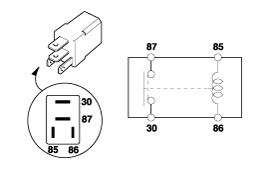
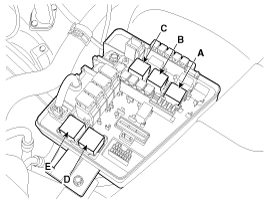
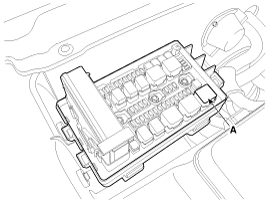
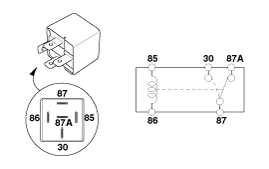
Power Relay (Type A)
|

Check for continuity between the terminals.
A : Back up lamp relay
B : Trunk open relay
C : Power outlet relay
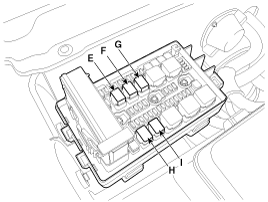
E : Washer relay
F : Front deicer relay
G : Horn relay
H : Fuel pump relay
I : Room lamp relay
| 1. |
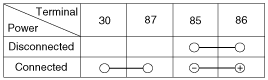
There should be continuity between the No.30 and No.87
terminals when power and ground are connected to the No.85 and No.86
terminals. |
| 2. |
There should be no continuity between the No.30 and No.87 terminals when power is disconnected.
|
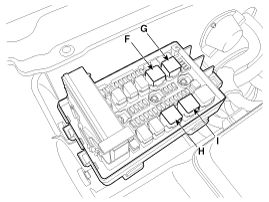
Power Relay (Type B)
Check for continuity between the terminals.
A : SSB (ACC) realy
B : ECS relay
C : C/Fan relay
D : SSB (IGN2) relay
E : SSB (IGN1) relay
F : Blower relay
G : Rear glass heater relay
H : Start relay
I : Head lamp relay
| 1. |
There should be continuity between the No.30 and No.87
terminals when power and ground are connected to the No.85 and No.86
terminals. |
| 2. |
There should be no continuity between the No.30 and No.87 terminals when power is disconnected.
|
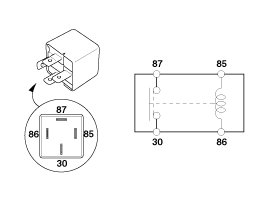

Power Relay (Type C)
Check for continuity between the terminals.
| 1. |
There should be continuity between the No.30 and No.87
terminals when power and ground are connected to the No.85 and No.86
terminals. |
| 2. |
There should be continuity between the No.30 and No.87 terminals when power is disconnected.
A : ECU relay
|
Fuse
| 1. |
Be sure there is no play in the fuse holders, and that the fuses are held securely. |
| 2. |
Are the fuse capacities for each circuit correctx |
| 3. |
Are there any blown fusesx
If a fuse is to be replaced, be sure to use a new fuse of the
same capacity. Always determine why the fuse blew first and completely
eliminate the problem before installing a new fuse. |
 Relay Box (Engine Compartment) Components and Components Location
Component Location
...
 Relay Box (Passenger Compartment) Components and Components Location
Component Location
...
See also:
High Pressure Fuel Pump Repair procedures
Removal
In case of removing the high pressure fuel pump, high
pressure fuel pipe, delivery pipe, and injector, there may be injury
caused by leakage of the high pressure f ...
Description and Operation
Warning Lamp Activation
Warning Lamp Behavior after Ignition On
As soon as the operating voltage is applied to the SRSCM
ignition input, the SRSCM activates the warning lamp for a LED lamp
c ...
Head Up Display ON/OFF
To activate the head up display, press the HUD button.
If you press the HUD button again, the head up display will be deactivated. ...
Categories
Hyundai Equus Manuals

© 2011-2026 Copyright www.heqmanual.com