
 Hyundai Equus: Speakers Repair procedures
Second generation VI (2009–2026) / Hyundai Equus VI 2009-2026 Service Manual / Body Electrical System / Premium AVN System / Speakers Repair procedures
Hyundai Equus: Speakers Repair procedures
Second generation VI (2009–2026) / Hyundai Equus VI 2009-2026 Service Manual / Body Electrical System / Premium AVN System / Speakers Repair procedures
Second generation VI (2009–2026) / Hyundai Equus VI 2009-2026 Service Manual / Body Electrical System / Premium AVN System / Speakers Repair procedures
| Inspection |
| 1. |
Troubleshooting for Speaker
| ||||||||||||||||||||||||||||||||||||||
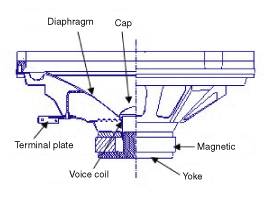

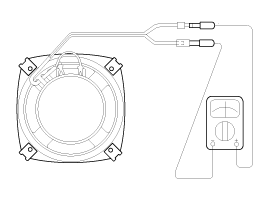

| Removal |
Front Speaker
| 1. |
Remove the front door trim panel.
(Refer to Body - "Front Door") |
| 2. |
Remove the front speaker (A) after removing 4 rivets.
|
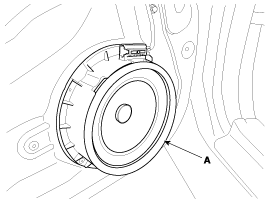
Rear Speaker
| 1. |
Remove the rear door trim panel.
(Refer to Body - "Rear Door") |
| 2. |
Remove the rear speaker (A) after removing 4 rivets.
|
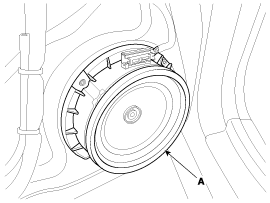
Front Door Tweeter Speaker
| 1. |
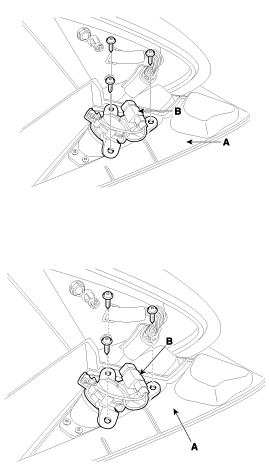
Remove the front door delta cover (A) after disconnecting the connector (B).
(Refer to Body - "Front Door")
|
| 2. |
Remove the tweeter speaker. |
Front Door Middle Range Speaker
| 1. |
Remove the front door trim panel.
(Refer to Body - "Front Door") |
| 2. |
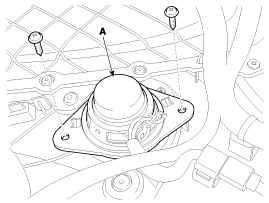
Remove the middle range speaker (A) after removing the screws and connector.
|
Rear Door Middle Range Speaker
| 1. |
Remove the rear door trim panel.
(Refer to Body - "Rear Door") |
| 2. |
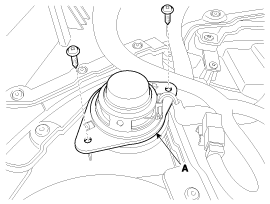
Remove the middle range speaker (A) after removing the screws and connector.
|
Rear Door Tweeter Speaker
| 1. |
Remove the rear door trim panel.
(Refer to Body - "Rear Door") |
| 2. |
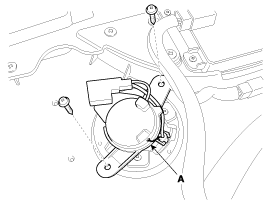
Remove the tweeter speaker (A) after removing the screws and connectors.
|
Crash Pad Center Speaker
| 1. |
Remove the crash pad center speaker grill (A).
|
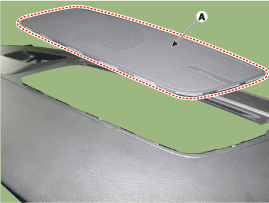
| 2. |
Remove the crash pad center speaker (A) after loosening the mounting screws (3EA).
|
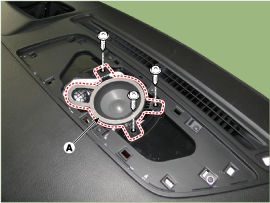
| 3. |
Disconnect the center speaker connector (A).
|
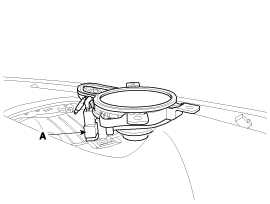
Sub Woofer Speaker
| 1. |
Remove the rear seat.
(Refer to Body - "Rear Seat") |
| 2. |
Remove the rear package tray (A).
(Refer to Body - "Rear Seat")
|
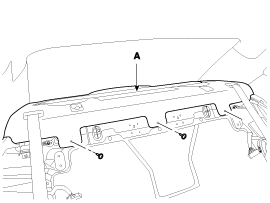
| 3. |
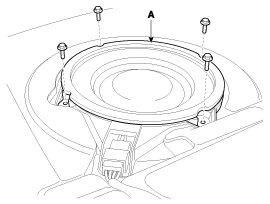
Remove the sub woofer speaker (A) after removing bolts (4EA).
|
Surround Speaker
| 1. |
Remove the rear seat.
(Refer to Body - "Rear Seat") |
| 2. |
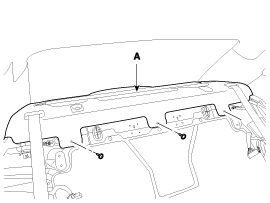
Remove the rear package tray (A).
(Refer to Body - "Rear Seat")
|
| 3. |
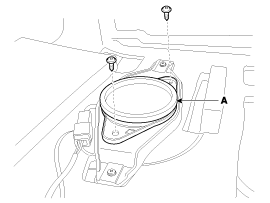
Remove the surround speaker (A) after removing screws (2EA).
|
| Installation |
Front Speaker
| 1. |
Install the front speaker. |
| 2. |
Install the front door trim. |
Rear Speaker
| 1. |
Install the rear speaker. |
| 2. |
Install the rear door trim. |
Front Door Tweeter Speaker
| 1. |
Install the tweeter speaker after connecting the tweeter speaker connector. |
| 2. |
Install the front door delta cover. |
Front Door Middle Range Speaker
| 1. |
Install the front door middle range speaker on the door trim panel. |
| 2. |
Install the front door trim panel. |
Rear Door Middle Range Speaker
| 1. |
Install the rear door middle range speaker on the door trim panel. |
| 2. |
Install the rear door trim panel. |
Rear Door Tweeter Speaker
| 1. |
Install the tweeter speaker on the door trim panel. |
| 2. |
Install the door trim panel. |
Crash Pad Center Speaker
| 1. |
Install the crash pad center speaker after connecting the connector. |
| 2. |
Install the crash pad center speaker grill. |
Sub Woofer Speaker
| 1. |
Install the sub woofer speaker after connecting the connector. |
| 2. |
Install the rear package tray and rear seat assembly. |
Surround Speaker
| 1. |
Install the surround speaker after connecting the connector. |
| 2. |
Install the rear package tray and rear seat assembly. |
Make sure the speaker connectors are plugged in properly. |
 AVN Antenna Repair procedures
Inspection
Glass Antenna Test
1.
Wrap aluminum foil (A) around the tip of the tester probe (B) as shown.
2.
Touch one tester probe to the glass antenna terminal (A) and
move the other teste ...
 AUX jack Schematic Diagrams
Circuit Diagram
...
See also:
Blower Unit Repair procedures
Replacement
1.
Disconnect the negative (-) battery terminal.
2.
Remove the heater and blower assembly.
(Refer to Heater - "Heater Unit")
3.
Separate the blower unit (A) from the heater un ...
Compressor Schematic Diagrams
Circuit diagram
1.
Air compressor connector
[Motor power connector (A)][Exhaust valve connector (B)][Temperature sensor connector (C)]
2.
Air compressor terminal function
[Motor power]
...
Intake Air Temperature Sensor (IATS) Specifications
Specification
TemperatureResistance (kx)°C°F-40-4040.93 ~ 48.35-20-413.89 ~ 16.030325.38 ~ 6.0910503.48 ~ 3.9020682.31 ~ 2.57401041.08 ~ 1.21601400.54 ~ 0.66801760.29 ~ 0.34
...
Categories
Hyundai Equus Manuals

© 2011-2026 Copyright www.heqmanual.com