 Hyundai Equus: Crach Pad Center Panel Repair procedures
Second generation VI (2009–2026) / Hyundai Equus VI 2009-2026 Service Manual / Body (Interior and Exterior) / Crash Pad / Crach Pad Center Panel Repair procedures
Hyundai Equus: Crach Pad Center Panel Repair procedures
Second generation VI (2009–2026) / Hyundai Equus VI 2009-2026 Service Manual / Body (Interior and Exterior) / Crash Pad / Crach Pad Center Panel Repair procedures
Second generation VI (2009–2026) / Hyundai Equus VI 2009-2026 Service Manual / Body (Interior and Exterior) / Crash Pad / Crach Pad Center Panel Repair procedures
| Replacement |
|

|

| 1. |
Remove the floor console assembly.
(Refer to Floor Console - "Floor Console Assembly") |
| 2. |
Remove the center fascia lower tray.
(Refer to Crash Pad - "Center Fascia Panel") |
| 3. |
Remove the AVN head unit.
(Refer to Body Electrical System - "AVN Head Unit") |
| 4. |
Remove the cluster fascia panel.
(Refer to Crash Pad - "Cluster Fascia Panel") |
| 5. |
Remove the crash pad lower panel.
(Refer to Crash Pad - "Crash Pad Lower Panel") |
| 6. |
Remove the glove box housing.
(Refer to Crash Pad - "Glove Box Housing") |
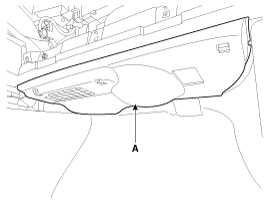
| 7. |
To remove the crash pad under cover [RH] (A), press both
sides of the locking pin and then pull it down in the direction of the
arrow.
|
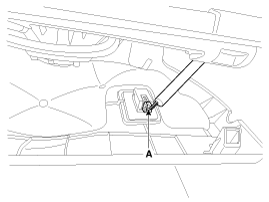
| 8. |
Disconnect the under lamp connector (A).
|
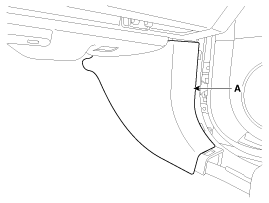
| 9. |
Remove the luggage trim[RH] (A).
|
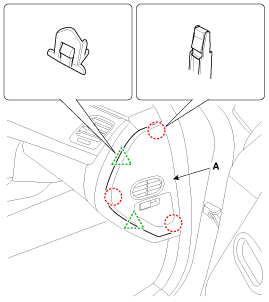
| 10. |
Using a screwdriver or remover, remove the crash pad side cover [RH] (A).
|
| 11. |
After loosening the mounting screws, bolts, nuts, then remove the crash pad center panel (A).
|

| 12. |
Install in the reverse order of removal.
|

 Crach Pad Center Panel Components and Components Location
Component Location
1. Crash pad center panel
...
 Main Crash Pad Assembly Components and Components Location
Component Location
1. Main crash pad assembly
...
See also:
Description and Operation
Description
Adaptive Front-lighting System (AFLS)
AFLS(Adaptive Front-lighting System)is a headlamp
orientation control system that takes into account both steering angle
and vehicle speed to ...
Front Seat Assembly Repair procedures
Replacement
1.
Remove the safety belt (A) by turning it in the direction of arrow using a flat-head screwdriver.
2.
Remove the front seat track mounting cover.
3.
After loosening the mount ...
Repair procedures
Adjustment
1.
After loosening the trunk lid hinge (A) mounting bolt, adjust the trunk lid by moving it up or down, or right or left.
2.
Adjust the trunk lid height by turning the trunk lid ove ...
Categories
Hyundai Equus Manuals

© 2011-2026 Copyright www.heqmanual.com