[Center Fascia Upper Panel]
| • |
Put on gloves to protect your hands. |
|
| • |
When prying with a flat-tip screwdriver, wrap it with
protective tape, and apply protective tape around the related parts, to
prevent damage. |
| • |
Use a plastic panel removal tool to remove interior trim pieces to protect from marring the surface. |
| • |
Take care not to bend or scratch the trim and panels. |
|
| 1. |
Using a screwdriver or remover, remove the cluster fascia upper panel (A). 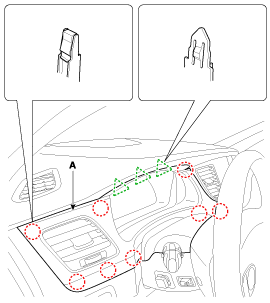
|
| 2. |
Using a screwdriver or remover, remove the center fascia upper panel (A). 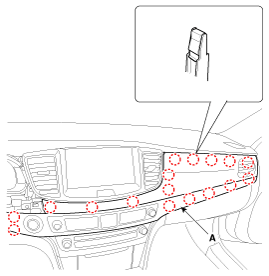
|
| 3. |
Disconnect the heater and A/C controller connector (A) and start connector (B). 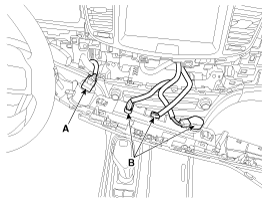
|
| 4. |
Loosen the mounting screws, remove the center fascia complete lower panel (A). 
|
| 5. |
Install in the reverse order of removal.
| • |
Make sure the connector is connected properly. |
| • |
Replace any damage clips. |
|
|
[Center Fascia Lower Panel]
| • |
Put on gloves to protect your hands. |
|
| • |
When prying with a flat-tip screwdriver, wrap it with
protective tape, and apply protective tape around the related parts, to
prevent damage. |
| • |
Use a plastic panel removal tool to remove interior trim pieces to protect from marring the surface. |
| • |
Take care not to bend or scratch the trim and panels. |
|
| 1. |
Remove the center fascia upper panel.
(Refer to Crash Pad - "Center Fascia Panel") |
| 2. |
Using a screwdriver or remover, remove the center fascia lower panel (A). 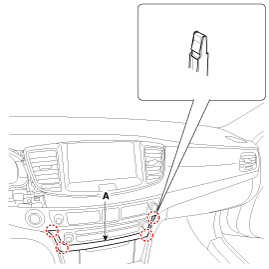
|
| 3. |
Install in the reverse order of removal.
| • |
Make sure the connector is connected properly. |
| • |
Replace any damage clips. |
|
|
[Center Fascia Lower Tray]
| • |
Put on gloves to protect your hands. |
|
| • |
When prying with a flat-tip screwdriver, wrap it with
protective tape, and apply protective tape around the related parts, to
prevent damage. |
| • |
Use a plastic panel removal tool to remove interior trim pieces to protect from marring the surface. |
| • |
Take care not to bend or scratch the trim and panels. |
|
| 1. |
Remove the center fascia upper panel.
(Refer to Crash Pad - "Center Fascia Panel") |
| 2. |
Remove the center fascia lower panel.
(Refer to Crash Pad - "Center Fascia Panel") |
| 3. |
Remove the front console upper complete.
(Refer to Floor Console - "Floor Console Assembly") |
| 4. |
Remove the E-Shifter assembly.
(Refer to Automatic Transmission Control System - "E-Shifter") |
| 5. |
Loosen the mounting screws, remove the center fascia lower tray (A). 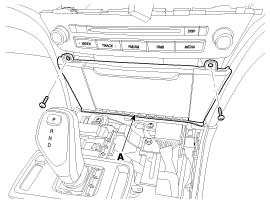
|
| 6. |
Disconnect the lighting connector (A) and USB connector (B) and antenna (C). 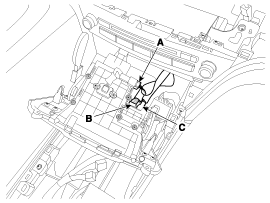
|
| 7. |
Install in the reverse order of removal.
| • |
Make sure the connector is connected properly. |
| • |
Replace any damage clips. |
|
|
Component Location
1. Center fascia upper panel2. Center fascia lower panel
...
Component Location
1. Crash pad lower panel
...
See also:
Inside Rear View Mirror Repair procedures
Replacement
•
Put on gloves to protect your hands.
•
When prying with a flat-tip screwdriver, wrap it with
protective tape, and apply p ...
Water pump Troubleshooting
Troubleshooting
Water Pump
SymptomsPossible CausesRemedyCoolant leakage
•
From the bleed hole of the water pump
Visually check
•
Check leaks after about ten-minute warming up.
• ...
Sunvisor Repair procedures
Replacement
•
When prying with a flat-tip screwdriver, wrap it with
protective tape, and apply protective tape around the related parts, to
prevent damage.
•
...
 Hyundai Equus: Center Fascia Panel Repair procedures
Second generation VI (2009–2026) / Hyundai Equus VI 2009-2026 Service Manual / Body (Interior and Exterior) / Crash Pad / Center Fascia Panel Repair procedures
Hyundai Equus: Center Fascia Panel Repair procedures
Second generation VI (2009–2026) / Hyundai Equus VI 2009-2026 Service Manual / Body (Interior and Exterior) / Crash Pad / Center Fascia Panel Repair procedures


 Center Fascia Panel Components and Components Location
 Crash Pad Lower Panel Components and Components Location