
 Hyundai Equus: Temperature Control Actuator Repair procedures
Second generation VI (2009–2026) / Hyundai Equus VI 2009-2026 Service Manual / Heating, Ventilation and Air Conditioning / Heater / Temperature Control Actuator Repair procedures
Hyundai Equus: Temperature Control Actuator Repair procedures
Second generation VI (2009–2026) / Hyundai Equus VI 2009-2026 Service Manual / Heating, Ventilation and Air Conditioning / Heater / Temperature Control Actuator Repair procedures
Second generation VI (2009–2026) / Hyundai Equus VI 2009-2026 Service Manual / Heating, Ventilation and Air Conditioning / Heater / Temperature Control Actuator Repair procedures
| Inspection |
| 1. |
Turn the ignition switch OFF. |
| 2. |
Disconnect the temperature control actuator connector. |
| 3. |
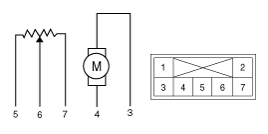
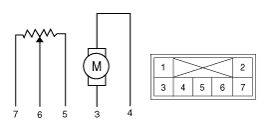
Verify that the temperature control actuator operates to the
warm (Driver's side) or cool (Passenger's side) position when connecting
12V to terminal 3 and grounding terminal 4.
Verify that the temperature control actuator operates to the
cool (Driver's side) or warm (Passenger's side) position when connected
in reverse.
[Driver's side]
[Passenger's side]
|
| 4. |
Connect the temperature control actuator connector. |
| 5. |
Turn the ignition switch ON. |
| 6. |
Check the voltage between terminal 6 and 7 (Driver's side) or 5 (Passenger's side).
Specification
It will feedback the current position of the actuator to controls. |
| 7. |
If the measured voltage is not within specification,
substitute with a known-good temperature control actuator and check for
proper operation. |
| 8. |
Replace the temperature control actuator if it is proved that there is a problem with it. |
| Replacement |
[Driver's side]
| 1. |
Disconnect the negative (-) battery terminal. |
| 2. |
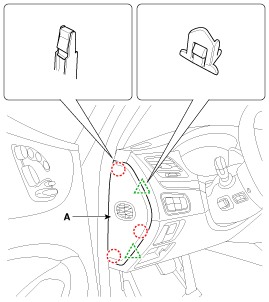
Using a screwdriver or remover, remove the driver's side crash pad side cover.
|
| 3. |
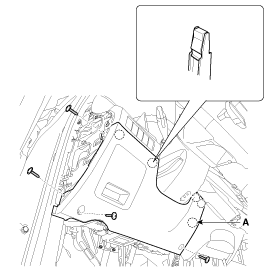
After loosening the mounting screws, remove the crash pad lower panel (A).
|
| 4. |
Disconnect the crash pad lower panel switch connector (A) and knee air bag connector (B).
|

| 5. |
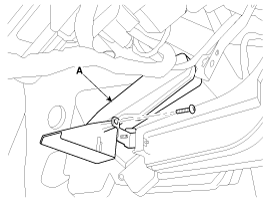
Remove the driver's side shower duct (A) after loosening the screw.
|
| 6. |
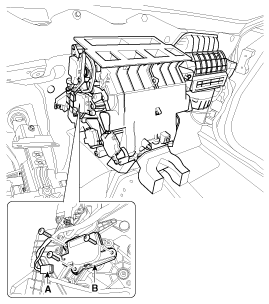
Disconnect the temperature control actuator connector (A),
and then remove the temperature control actuator (B) after loosening the
mounting screws.
|
| 7. |
Install in the reverse order of removal. |
[Passenger's side]
| 1. |
Disconnect the negative (-) battery terminal. |
| 2. |
Remove the cowl side trim.
(Refer to Body - "Cowl Side Trim") |
| 3. |
To remove the crash pad under cover [RH] (A), press both sides of the locking pin and then pull it down.
|

| 4. |
Disconnect the under lamp connector (A).
|

| 5. |
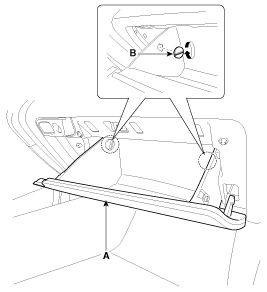
Remove the stopper (B) from the glove box (A).
|
| 6. |
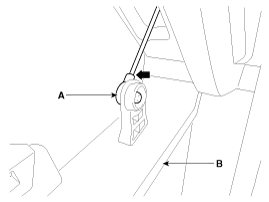
Disconnect the air damper (A) from the glove box (B).
|
| 7. |
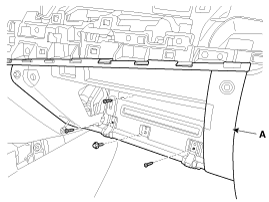
Remove the glove box housing (A) after loosening the mounting screws and nuts.
|
| 8. |
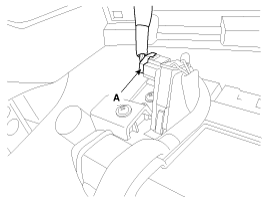
Disconnect the glove box lamp connector (A).
|
| 9. |
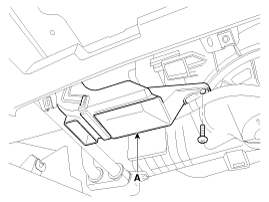
Remove the passenger's side shower duct (A).
|
| 10. |
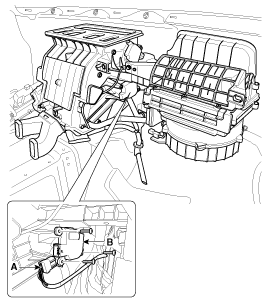
Disconnect the connector (A) and then remove the temperature control actuator (B) after loosening the mounting screws.
|
| 11. |
Install in the reverse order of removal. |
 Temperature Control Actuator Description and Operation
Description
The temperature control actuator is located at the heater unit. It regulates the temperature by the procedure as follows.
The signal from the control unit adjusts the position of the ...
 Mode Control Actuator Description and Operation
Description
The mode control actuator is located at the heater unit.
It adjusts the position of the mode door by operating the
mode control actuator based on the signal of the A/C control unit. ...
See also:
Ambient Temperature Sensor Repair procedures
Inspection
1.
Turn the ignition switch OFF.
2.
Remove the front bumper.
(Refer to Body - "Front Bumper Cover")
3.
Disconnect ambient temperature sensor.
4.
Check the resistance of the ...
Maintenance service
You should exercise the utmost care to prevent damage to your vehicle and injury
to yourself whenever performing any maintenance or inspection procedures.
Should you have any doubts concerning the ...
Reset items
Items should be reset after the battery has been discharged or the battery has
been disconnected.
Auto up/down window
Sunroof
Driver position memory system
Trip computer
Climate control ...
Categories
Hyundai Equus Manuals

© 2011-2026 Copyright www.heqmanual.com