 Hyundai Equus: Repair procedures
| Inspection |
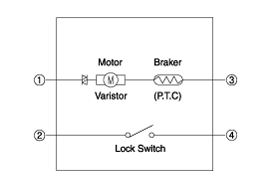
Front Door Lock Module Inspection
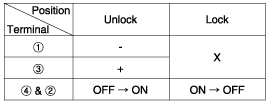
| 1. |
Remove the front door trim.
(Refer to Body - "Front Door Trim") |
| 2. |
Remove the front door module.
(Refer to Body - "Front Door Module") |
| 3. |
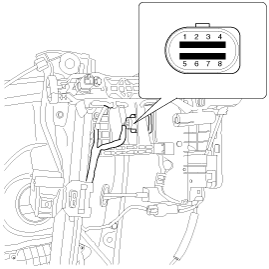
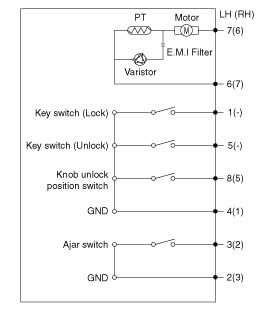
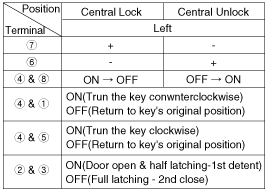
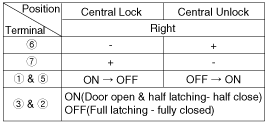
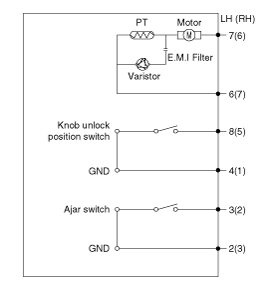
Disconnect the connectors from the actuator.
|
| 4. |
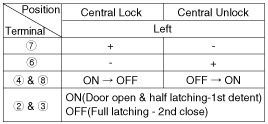
Check actuator operation by connecting power and ground
according to the table. To prevent damage to the actuator, apply battery
voltage only momentarily.
|
| 5. |
Disconnect the power ajar switch connector from door lock actuator.
|
| 6. |
Check for continuity between terminals in half latching condition according to the table.
|
| 7. |
Operate the cinching reset procedure when power door latch operation (automatic full latching) is faulty.
|
Rear Door Lock Module Inspection
| 1. |
Remove the rear door trim.
(Refer to Body - "Rear Door Trim") |
| 2. |
Remove the rear door module.
(Refer to Body - "Rear Door Module") |
| 3. |
Disconnect the connectors from the actuator.
|
| 4. |
Check actuator operation by connecting power and ground
according to the table. To prevent damage to the actuator, apply battery
voltage only momentarily.
|
| 5. |
Disconnect the power ajar switch connector from door lock actuator.
|
| 6. |
Check for continuity between terminals in half latching condition according to the table.
|

| 7. |
Operate the cinching reset procedure when power door latch operation (automatic full latching) is faulty.
|
Trunk Lock Module Inspection
| 1. |
Remove the trunk trim.
(Refer to Body - "Trunk Trim") |
| 2. |
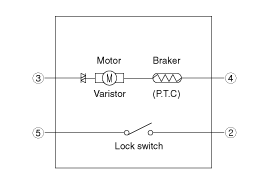
Disconnect the 4P connector from the actuator.
|
| 3. |
Check actuator operation by connecting power and ground
according to the table. To prevent damage to the actuator, apply battery
voltage only momentarily.
|
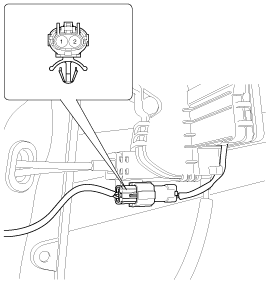
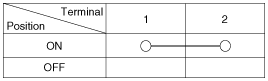
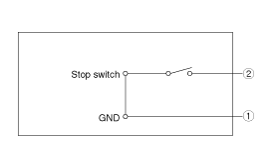
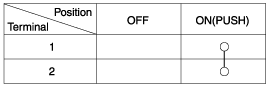
Trunk Open Switch
| 1. |
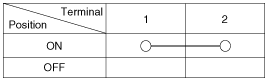
Check for continuity between the terminals in each switch position according to the table.
|
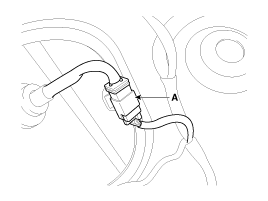
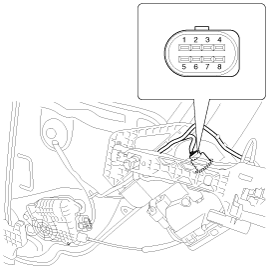
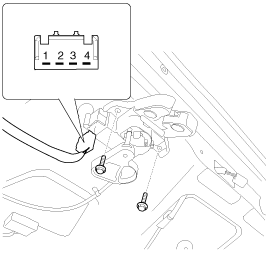
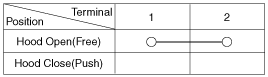
Hood Switch
| 1. |
Disconnect the connector (A) and bolts from the hood switch.
|
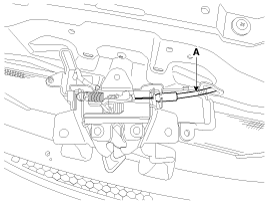
| 2. |
Check for continuity between the terminals and ground according to the table.
(Refer to Body - "Hood Latch")
|
Burglar Horn
| 1. |
Remove the burglar horn after removing a nut and disconnect the 2P connector from the burglar horn.
|
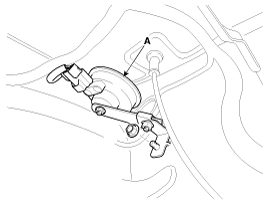
| 2. |
Test the burglar horn by connecting battery power to the terminal 1 and ground the terminal 2. |
| 3. |
The burglar horn should sound. If the burglar horn fails to sound replace it. |
 Description and Operation
Description
Burglar Alarm State [B/A State]
B/A StateDescriptionDISARM
1.
In "DISARM" state, no vehicle start inhibition. So, when
door, hood, or Tailgate is opened, there is no alarm sound ...

See also:
Description and Operation
Description
EHPS uses an electromotor to assist you in steering the
vehicle. It senses the vehicle speed and road condition.If the engine is
off or if the power steering system becomes inoperat ...
Height Adjust Components and Components Location
Component Location
1. Height adjust
...
Head Lamps Description and Operation
HID Head Lamp
1.
Bulb
(1)
Elements
Xenon gas: Xenon gas activates the initial reaction for rapid illuminating.
Molybdenum electrode: anode arcing
Metal halide salts: color composing component ...
Categories
Hyundai Equus Manuals

© 2011-2026 Copyright www.heqmanual.com