 Hyundai Equus: Hood Assembly Repair procedures
Second generation VI (2009–2026) / Hyundai Equus VI 2009-2026 Service Manual / Body (Interior and Exterior) / Hood / Hood Assembly Repair procedures
Hyundai Equus: Hood Assembly Repair procedures
Second generation VI (2009–2026) / Hyundai Equus VI 2009-2026 Service Manual / Body (Interior and Exterior) / Hood / Hood Assembly Repair procedures
Second generation VI (2009–2026) / Hyundai Equus VI 2009-2026 Service Manual / Body (Interior and Exterior) / Hood / Hood Assembly Repair procedures
| Replacement |
|

|

| 1. |
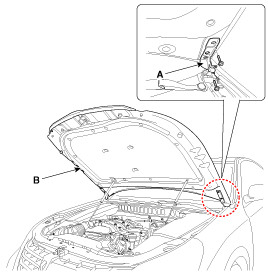
Using a screwdriver, lift the socket clips (A) up slightly on both ends of the lifter (B).
|

| 2. |
After loosening the hood hinge (A) mounting bolts, remove the hood assembly (B).
|
| 3. |
Installation is the reverse of removal.
|
 Hood Assembly Components and Components Location
Component Location
1. Hood assembly
...
 Hood Lift Repair procedures
Replacement
•
When removing and installing the hood lifter, an assistant is necessary.
•
When removing the clips, use a clip remover.
1.
Using a screwdrive ...
See also:
Limousine Interior
Interior A
Front inner pillar tooling hole (O9)Cowl cross bar mounting hole (O11)Front door checker mounting hole (O11)Side sill inner reinforcement tooling hole (O7)Seat belt height adjuster upp ...
Specifications
Tightening Torques
ItemN.mkgf.mlb-ftDriver airbag (DAB)7.8 ~ 10.80.8 ~ 1.15.8 ~ 8.0Passenger airbag (PAB)7.8 ~ 11.80.8 ~ 1.25.8 ~ 8.7Side airbag (SAB)6.9 ~ 8.80.7 ~ 0.95.1 ~ 6.5Curtain airbag (C ...
Crankshaft Position Sensor (CKPS) Description and Operation
Description
Crankshaft Position Sensor (CKPS) detects the crankshaft
position and is one of the most important sensors of the engine control
system. If there is no CKPS signal input, the engine ...
Categories
Hyundai Equus Manuals

© 2011-2026 Copyright www.heqmanual.com