
 Hyundai Equus: Heated Oxygen Sensor (HO2S) Repair procedures
Second generation VI (2009–2026) / Hyundai Equus VI 2009-2026 Service Manual / Engine Control/Fuel System / Engine Control System / Heated Oxygen Sensor (HO2S) Repair procedures
Hyundai Equus: Heated Oxygen Sensor (HO2S) Repair procedures
Second generation VI (2009–2026) / Hyundai Equus VI 2009-2026 Service Manual / Engine Control/Fuel System / Engine Control System / Heated Oxygen Sensor (HO2S) Repair procedures
Second generation VI (2009–2026) / Hyundai Equus VI 2009-2026 Service Manual / Engine Control/Fuel System / Engine Control System / Heated Oxygen Sensor (HO2S) Repair procedures
| Inspection |
| 1. |
Turn the ignition switch OFF. |
| 2. |
Disconnect the HO2S connector. |
| 3. |
Measure resistance between the HO2S terminals 3 and 4. |
| 4. |
Check that the resistance is within the specification.
|
| Removal |
| [Bank 1/Sensor 1] |
| 1. |
Turn the ignition switch OFF and disconnect the battery negative (-) cable. |
| 2. |
Disconnect the heated oxygen sensor connector. |
| 3. |
Lift the vehicle. |
| 4. |
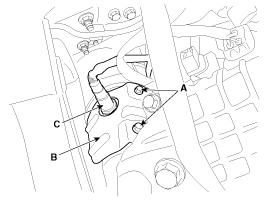
Remove the heater protector (B) from the catalytic converter after removing the bolt (A). |
| 5. |
Remove the heated oxygen sensor (C) with the spanner after lifting the heater protector (B).
|
| [Bank 1/Sensor 2] |
| 1. |
Turn the ignition switch OFF and disconnect the battery negative (-) cable. |
| 2. |
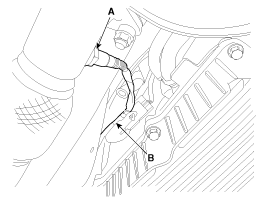
Disconnect the heated oxygen sensor connector (B). |
| 3. |
Lift the vehicle. |
| 4. |
Remove the heated oxygen sensor (A).
|
| [Bank 2/Sensor 1, Bank 2/Sensor 2] |
| 1. |
Turn the ignition switch OFF and disconnect the battery negative (-) cable. |
| 2. |
Lift the vehicle. |
| 3. |
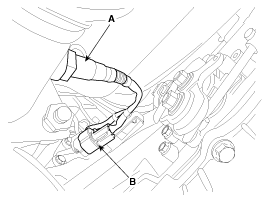
Disconnect the heated oxygen sensor connector (A). |
| 4. |
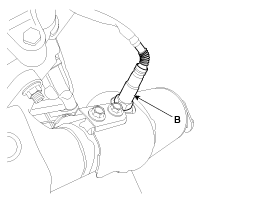
Remove the heated oxygen sensor (B).
[Bank 2/Sensor 1]
[Bank 2/Sensor 2]
|
| Installation |
|

|
| 1. |
Install in the reverse order of removal.
|
 Heated Oxygen Sensor (HO2S) Schematic Diagrams
Circuit Diagram
...
 Accelerator Position Sensor (APS) Description and Operation
Description
Accelerator Position Sensor (APS) is installed on the
accelerator pedal module and detects the rotation angle of the
accelerator pedal. The APS is one of the most important sensors ...
See also:
Anti-lock brake system (ABS)
WARNING
ABS (or ESC) will not prevent accidents due to improper or dangerous driving
maneuvers. Even though vehicle control is improved during emergency braking, always
maintain a safe distance b ...
Wheel alignment and tire balance
The wheels on your vehicle were aligned and balanced carefully at the factory
to give you the longest tire life and best overall performance.
In most cases, you will not need to have your wheels al ...
All season tires
HYUNDAI specifies all season tires on some models to provide good performance
for use all year round, including snowy and icy road conditions.
All season tires are identified by ALL SEASON and/or M ...
Categories
Hyundai Equus Manuals

© 2011-2026 Copyright www.heqmanual.com