 Hyundai Equus: Brake Booster Repair procedures
Second generation VI (2009–2026) / Hyundai Equus VI 2009-2026 Service Manual / Brake System / Brake System / Brake Booster Repair procedures
Hyundai Equus: Brake Booster Repair procedures
Second generation VI (2009–2026) / Hyundai Equus VI 2009-2026 Service Manual / Brake System / Brake System / Brake Booster Repair procedures
Second generation VI (2009–2026) / Hyundai Equus VI 2009-2026 Service Manual / Brake System / Brake System / Brake Booster Repair procedures
| Brake Booster Operating Test |
For simple checking of the brake booster operation, carry out the following tests.
| 1. |
Run the engine for one or two minutes, and then stop it. If
the pedal depresses fully the first time but gradually becomes higher
when depressed succeeding times, the booster is operating properly, if
the pedal height remains unchanged, the booster is inoperative.
|
| 2. |
With the engine stopped, step on the brake pedal several times.
Then step on the brake pedal and start the engine. If the
pedal moves downward slightly, the booster is in good condition. If
there is no change, the booster is inoperative.
|
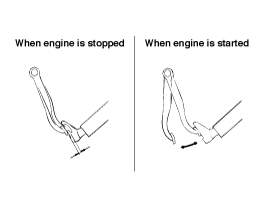
| 3. |
With the engine running, step on the brake pedal and then stop the engine.
Hold the pedal depressed for 30 seconds. If the pedal height
does not change, the booster is in good condition, if the pedal rises,
the booster is inoperative.
If the above three tests are okay, the booster performance can be determined as good.
Even if one of the above three tests is not okay, check the check valve, vacuum hose and booster for malfunction.
|
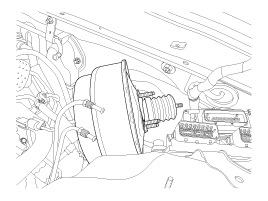
| Removal |
| 1. |
Turn ignition switch OFF and disconnect the negative (-) battery cable. |
| 2. |
Remove the cover. |
| 3. |
Disconnect the ECM connector (A) and TCM connector (B).
|
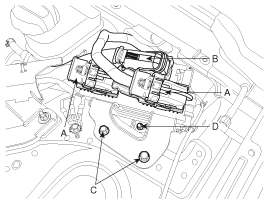
| 4. |
Remove the ECM & TCM bracket installation bolts (C) and nut (D). |
| 5. |
Remove the fuel hose (E).
|
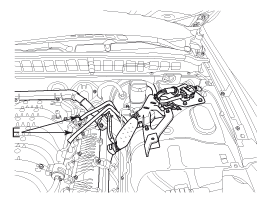
| 6. |
Then take off the control harness and protector. |
| 7. |
Disconnect the vacuum hose (A) from the brake booster.
|
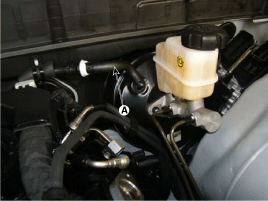
| 8. |
Remove the master cylinder.
(Refer to Brake System - "Master Cylinder") |
| 9. |
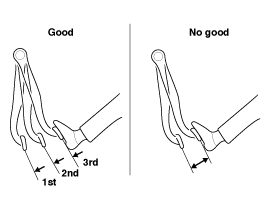
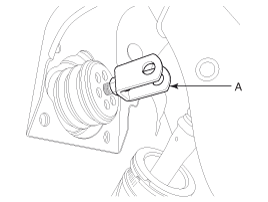
Remove the snap pin (A) and clevis pin (B).
|
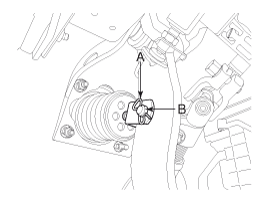
| 10. |
Remove the mounting nuts.
|
| 11. |
Remove the clevis (A).
|
| 12. |
Remove the brake booster.
|
| Inspection |
| 1. |
Inspect the check valve in the vacuum hose.
|

| 2. |
Check the boot for damage. |
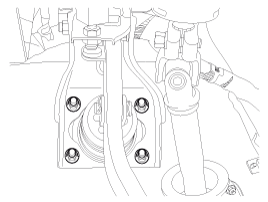
| Installation |
| 1. |
Install the brake booster into the hole. |
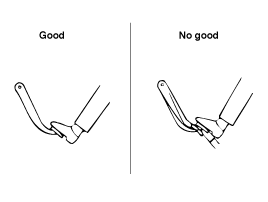
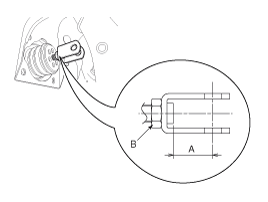
| 2. |
Install the booster considering the length (A).
Between input rod end and clevis hole.
|
| 3. |
Install the booster tightening nuts.
|
| 4. |
Install a snap pin (B) to the clevis pin (A).
|
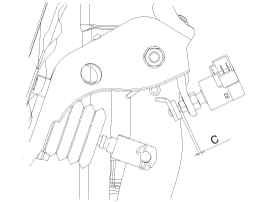
| 5. |
Set the gap (C) for stop lamp switch at 1.0 ~ 2.0mm.
|
| 6. |
Install the master cylinder, then install the brake tubes to the master cylinder.
(Refer to Brake System - "Master Cylinder") |
| 7. |
Connect the vacuum hose to the brake booster. |
| 8. |
Connect the fuel hose and control harness. |
| 9. |
Connect the connector after installing the ECM and TCM. |
| 10. |
After filling the brake reservoir with brake fluid, bleed the system.
(Refer to Brake System - "Brake System Bleeding") |
| 11. |
Check for fluid leakage. |
| 12. |
Check and adjust the brake pedal for proper operation. |
 Brake Booster Components and Components Location
Components
1. Brake booster2. Master cylinder assembly3. Washer4. Nut5. Vacuum hose (Lammda)6. Vacuum hose (Tau)
...
 Master Cylinder Components and Components Location
Components
1. Reservoir cap2. Reservoir3. Grommet4. Cylinder pin5. Retainer6. Primary piston assembly7. Secondary piston assembly8. Master cylinder body
...
See also:
Front Seat Shield Inner Cover Repair procedures
Replacement
•
Put on gloves to protect your hands.
•
When prying with a flat-tip screwdriver, wrap it with
protective tape, and apply p ...
Good braking practices
WARNING
Whenever leaving vehicle or parking, always set the parking brake as
far as possible and fully engage the vehicle's transmission into the park position.
Vehicles not fully engage ...
Injector Repair procedures
Inspection
1.
Turn the ignition switch OFF.
2.
Disconnect the injector connector.
3.
Measure resistance between the injector terminals 1 and 2.
4.
Check that the resistance is within t ...
Categories
Hyundai Equus Manuals

© 2011-2026 Copyright www.heqmanual.com