 Hyundai Equus: ECU Schematic Diagrams
Second generation VI (2009–2026) / Hyundai Equus VI 2009-2026 Service Manual / Suspension System / Air Suspension System / ECU Schematic Diagrams
Hyundai Equus: ECU Schematic Diagrams
Second generation VI (2009–2026) / Hyundai Equus VI 2009-2026 Service Manual / Suspension System / Air Suspension System / ECU Schematic Diagrams
Second generation VI (2009–2026) / Hyundai Equus VI 2009-2026 Service Manual / Suspension System / Air Suspension System / ECU Schematic Diagrams
| Circuit diagram |
| 1. |
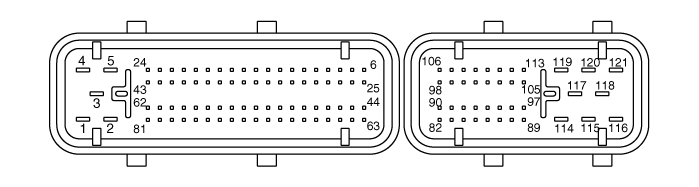
ECU Connector
|
| 2. |
ECU Terminal function
|
 ECU Description and Operation
Description
Analyzes each variety sensor and communication data and executes air suspension control.
That part controls system and maintains function. ...
 ECU Repair procedures
Removal
•
Avoid suffering excessive impact.
•
Do not entering the water into pin inside.
•
Do not pile up the parts.
•
Take care not to damage the ...
See also:
Description and Operation
Description
Multi-view Camera System is the system that allows video
monitoring of 360 degrees around the vehicle. The system includes 4
ultra optical camera mounted around the vehicle (front, ...
Front Strut Assembly Repair procedures
Removal
1.
Remove the front wheel and tire (A) from front hub .
Tightening torque:
88.3 ~ 107.9 N.m (9.0 ~ 11.0 kgf.m, 65.1 ~ 79.6 lb-ft)
•
Be careful not to dama ...
Rail Pressure Sensor (RPS) Description and Operation
Description
Rail Pressure Sensor (RPS) is installed on the delivery pipe
and measures the instantaneous fuel pressure in the delivery pipe. The
sensing element (Semiconductor element) built in ...
Categories
Hyundai Equus Manuals

© 2011-2026 Copyright www.heqmanual.com