 Hyundai Equus: Radiator Repair procedures
Second generation VI (2009–2026) / Hyundai Equus VI 2009-2026 Service Manual / Engine Mechanical System / Cooling System / Radiator Repair procedures
Hyundai Equus: Radiator Repair procedures
Second generation VI (2009–2026) / Hyundai Equus VI 2009-2026 Service Manual / Engine Mechanical System / Cooling System / Radiator Repair procedures
Second generation VI (2009–2026) / Hyundai Equus VI 2009-2026 Service Manual / Engine Mechanical System / Cooling System / Radiator Repair procedures
| Inspection |
Radiator Cap Testing
| 1. |
Remove the radiator cap, wet its seal with engine coolant, then install it to pressure tester.
|
| 2. |
Apply a pressure of 93 ~ 123kPa (0.95 ~ 1.25kgf/cmx, 14 ~ 19psi). |
| 3. |
Check for a drop in pressure. |
| 4. |
If the pressure drops, replace the cap. |
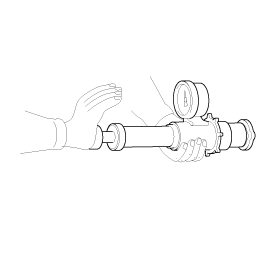
Radiator Leakage Test
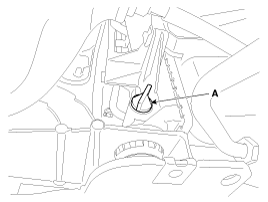
| 1. |
Wait until engine is cool, then carefully remove the radiator
cap and fill the radiator with engine coolant, then install a pressure
tester (A) on it.
|
| 2. |
Apply a pressure of 93 ~ 123kPa (0.95 ~ 1.25kgf/cmx, 14 ~ 19psi). |
| 3. |
Inspect for engine coolant leaks and a drop in pressure. |
| 4. |
If the pressure drops, check hoses, the radiator and the
water pump for leakage. If there is no leakage, inspect the heater core,
the cylinder block and the cylinder head. |
| 5. |
Remove the tester and reinstall the radiator cap.
|

| Removal |
System is under high pressure when the engine is hot. To
avoid danger of releasing scalding engine coolant, remove the cap only
when the engine is cool. |

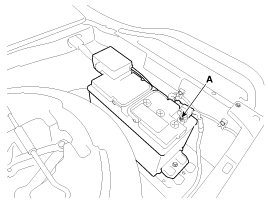
| 1. |
Disconnect the negative terminal (A) from the battery.
|
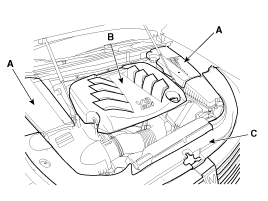
| 2. |
Remove the engine room cover (A), engine cover (B) and radiator grill upper cover (C).
|
| 3. |
Loosen the drain plug (A) and drain the engine coolant. Remove the radiator cap (B) to speed draining.
|
| 4. |
Remove the air cleaner assembly.
|
| 5. |
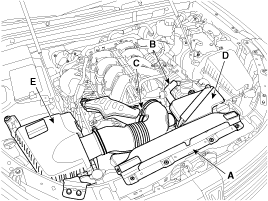
Disconnect the radiator upper hose (A) and lower hose (B).
|
| 6. |
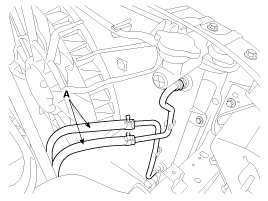
Disconnect the ATF cooler hoses (A).
|
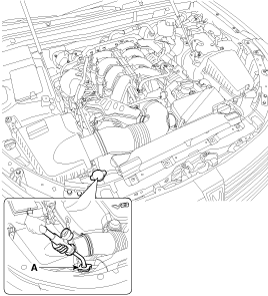
| 7. |
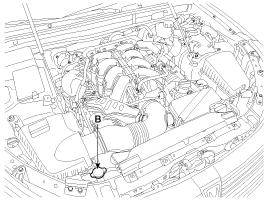
Disconnect the fan motor connector (A). If necessary, loosen the fuse box fixing bolt for your convenience.
|
| 8. |
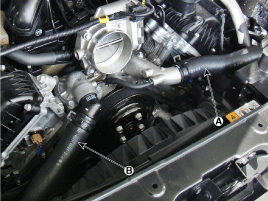
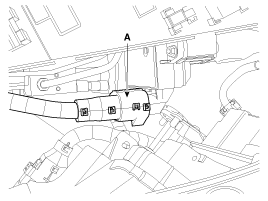
Remove the radiator mounting brackets (A). |
| 9. |
Remove the radiator & condenser mounting bolts (B).
|
| 10. |
Remove the radiator & cooling fan assembly from the vehicle. |
| 11. |
Installation is reverse order of removal.
Fill the radiator with coolant and check for leaks. |
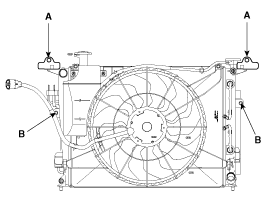
 Radiator Components and Components Location
Components
1. Cooling fan assembly2. Radiator lower hose3. Radiator upper hose4. Coolant reservoir tank5. Radiator6. Mounting insulator7. Mounting bracket
...
 Water pump Components and Components Location
Components
1. Drive belt2. Drive belt tensioner3. Drive belt idler4. Water pump pulley5. Water pump6. Water pump gasket
...
See also:
Horn
To sound the horn, press the area indicated by the horn symbol on your steering
wheel (see illustration). The horn will operate only when this area is pressed.
CAUTION
Do not strike the horn s ...
Front Lower Arm Repair procedures
Removal
Remove the lateral arm.
1.
Remove the front wheel and tire (A) from front hub .
Tightening torque:
88.3 ~ 107.9 N.m (9.0 ~ 11.0 kgf.m, 65.1 ~ 79.6 lb-ft)
• ...
Engine Control Module (ECM) Schematic Diagrams
ECM Terminal And Input / Output signal
ECM Harness Connector
ECM Terminal Function
Connector [C200-A]
Pin No.DescriptionConnected to1Ignition Coil (Cylinder #3) control outputIgnition Coil ( ...
Categories
Hyundai Equus Manuals

© 2011-2026 Copyright www.heqmanual.com