 Hyundai Equus: PGS Unit (Back & Blinde Unit) Repair procedures
Second generation VI (2009–2026) / Hyundai Equus VI 2009-2026 Service Manual / Body Electrical System / Parking Guide System (PGS) / PGS Unit (Back & Blinde Unit) Repair procedures
Hyundai Equus: PGS Unit (Back & Blinde Unit) Repair procedures
Second generation VI (2009–2026) / Hyundai Equus VI 2009-2026 Service Manual / Body Electrical System / Parking Guide System (PGS) / PGS Unit (Back & Blinde Unit) Repair procedures
Second generation VI (2009–2026) / Hyundai Equus VI 2009-2026 Service Manual / Body Electrical System / Parking Guide System (PGS) / PGS Unit (Back & Blinde Unit) Repair procedures
| Removal |
| 1. |
Disconnect the negative (-) battery terminal. |
| 2. |
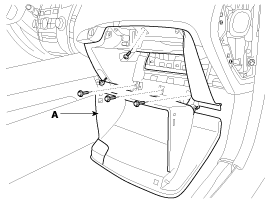
Remove the glove box housing (A).
(Refer to Body - "Crach Pad")
|
| 3. |
Remove the glove box housing connector (A).
|

| 4. |
Remove the DIS head unit.
(Refer to Body - "DIS System") |
| 5. |
Remove the USB interface unit. |
| 6. |
Remove the PGS unit (A).
|

| Installation |
| 1. |
Install the PGS unit. |
| 2. |
Install the USB interface unit. |
| 3. |
Install the DIS head unit. |
| 4. |
Install the glove box housing. |
 PGS Unit (Back & Blinde Unit) Schematic Diagrams
Circuit Diagram
...

See also:
Trunk Lid Weatherstrip Repair procedures
Replacement
1.
Remove the trunk lid weatherstrip (A).
•
Do not apply sealant to the body.
2.
Install in the reverse order of removal.
â ...
Glove Box Housing Components and Components Location
Component Location
1. Glove box housing
...
Blower Unit Components and Components Location
Component Location
Components
1. Intake Duct Case2. Intake Duct Case (A)3. Intake Door4. Intake Actuator5. Seal6. Blower Upper Case7. Blower Lower Case8. Seal9. Climate Control Air Filter Cover1 ...
Categories
Hyundai Equus Manuals

© 2011-2026 Copyright www.heqmanual.com