 Hyundai Equus: Description and Operation
Second generation VI (2009–2026) / Hyundai Equus VI 2009-2026 Service Manual / Body Electrical System / Power Windows / Description and Operation
Hyundai Equus: Description and Operation
Second generation VI (2009–2026) / Hyundai Equus VI 2009-2026 Service Manual / Body Electrical System / Power Windows / Description and Operation
Second generation VI (2009–2026) / Hyundai Equus VI 2009-2026 Service Manual / Body Electrical System / Power Windows / Description and Operation
| Function |
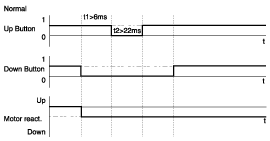
B+ and Power Window Enable
ECU power ought to be supplied from B+ in order to secure the RAM and its memory.
ECU observes the level of power window enable to decide the
state (normal mode, sleep mode). The ECU is allowed to operate the motor
with power window enable = On and stop the motor as well as change to
the sleep mode with power window enable=Off. However, the reverse by
anti-pinch (safety) function ought to be completed regardless of the
power window enable on/off.
Self Diagnosis
| 1) |
Checksum error of RAM after Wake-Up |
| - |
S/W reset, De-normalization |
| 2) |
Low voltage (Ubat<5V) in operating state |
| - |
S/W reset, De-normalization |
| 3) |
Hall sensor direction error except speed hall sensor
error(Hardware error, No plausibility between the switch command and
rotational direction of the motor) |
| - |
De-normalization, No auto up is allowed. |
| 4) |
Normalized and the position value of closing window is 3cm above the previous “0” position |
| - |
Stop the movement, De-normalization |
| 5) |
Normalized and the position value of opening window is 5cm above the entire travel |
| - |
Stop the movement, De-normalization |
| 6) |
Abnormal behavior of ECU |
| - |
H/W reset by the watch dog control, No movement |
| 7) |
No plausibility of Flash ROM data after POR / wake-up |
| - |
Stop the movement, De-normalization |
Thermal Protection
Software provides an algorithm in order to prevent the motor
from thermal overheating under the specified conditions like the valid
Flash ROM Data.
After power on reset, the software thermal counter starts to
count from the initial value. In case of motor running, software
increases the thermal counter by using the motor heating characteristic,
otherwise the thermal counter decreases by using the motor cooling
characteristic.
There exist 2 thermal protection limits. If the software
thermal counter is over the first limit, the motor movement stops until
the software thermal counter decrease to the release limit temperature
value, but still allows the current movement to finish. If the software
thermal counter is over the second limit (while motor running), the
movement stops at once until the release temperature value is reached
(reversing will not be interrupted by software thermal protection).
Voltage supply = 13.5 V
Load = 3 N.m
Temperature = 23°C± 5°C
The motor is able to continue to operate at least “15”
cycles without a break under the above conditions and after thermal
protection is activated, the motor turns to the operational condition
within “35±5” seconds.
Test starts with SW-thermal counter at the initial value.
Cycle: Full closed > 1sec. rest > Full opened > 1sec. rest
2nd heating limit > 1st heating limit |

Normalization
After power on reset or error detection, the motor has to be normalized at the fully closed position. How to be normalized:
| • |
Move the window upwards into the fully closed position. As
the window reaches the fully closed position, hold the power window
switch in auto for t x tblock. If the block is recognized, the system
state turns to normalized. |
Block Control
“tblock” time is defined as the time duration that the
system does not receive the valid hall sensor pulse while motor ON. When
the system doesn’t detect the hall sensor pulse for tblock = 200ms ±
10ms the software recognizes the window state as a block and terminates
the motor or carries out the reverse operation by anti-pinch (safety)
function.
In case of the block detection within the anti-pinch (safety) function range, the system will act on the anti-pinch function. |
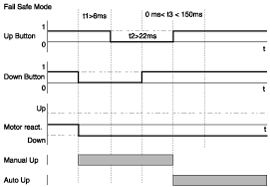
Power Window Switch And Stuck Filter
The permanent active power window switches (input up and
down) are ignored by software after input levels are active for t x
(20 ± 0.4) sec.
| 1. |
Manual Up
|
| 2. |
Manual Down
|

| 3. |
(Panic) Automatic Up
|

| 4. |
Automatic Down
|
Reverse Control By Anti-pinch (Safety) Function
When the safety function is active, ECU stops all sort of
auto-up function at once and executes the reverse as mentioned below.
Measuring manner of the reverse distance: Along the B-pillar (Refer to
the next picture)
| 1. |
Panic Mode
“L”: Panic reverse distance (25mm) | ||||||||||||||||||||||||||||||
| 2. |
Auto Up
Reverse distance
|
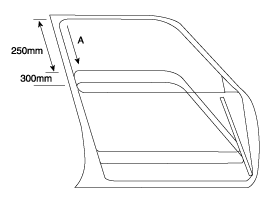
| 3. |
Reverse Operation Range
Type A: 4mm ~ a mm (Maximal travel – 100mm)
a: Front (about 346mm), Rear (about330mm)
|
Measuring The Anti-pinch Force
Measuring tool: Diameter 25mm, 50mm and 200mm semi-rigid cylindrical bar (10N/mm stiffness)
Measuring method:
| - |
Put the semi-rigid bar described above into the space between
the door frame and window edge and measure the pinching force from the
point where the bar first contacts with the window. |
| - |
There exists no semi-rigid bar measurement tool at present,
so that a commonly used measuring tool is employed here. However, a
special care should be taken to prevent the measuring tool from moving
back and forth, for example, holding the tool by both hands and fix on
the glass or on the frame. |
| - |
The ECU shall reverse the window before it exerts a pinch force mentioned in the regulation |
No rattling and swinging of the measurement kit on the window during the measuring |
Denormalization
Under conditions below, ECU turns to denormalized status.
After denormalization, auto up and safety function shall not be
operated. In order to make these function active again, ECU should go
through the normalization process illustrated in chapter 4.4.
Denormalization conditions:
| 1) |
Continuous 15 times reverses |
| 2) |
Power off during motor operation |
| 3) |
Driver side door opened and window glass is at the
bottom(hard stop position) with IGN on, IGN Off x> within Tsec(BH:
2sec,VI:5sec), IGN On x> Manual Down switch signal input 3 times
within 5sec x> De-normalization(If IGN off>on is not fulfilled
within 2sec or manual down switch signal is not inputted within 5sec
then repeat again this cycle) |
| Door and Glass Status | IGN Status | Input Time | IGN Status | Switch Input Status | Switch Input Times | Normalizati on Status | ||
| Re-input time | IGN Status | Switch Input | ||||||
| Driver side door opened, Window glass is bottom with IGN on(Hard stop) | IGN Off | DtxTsec BH:2secVI:5sec | IGN On | x t x 5sec | IGN On | Press and release Manual down switch | 3times | De-normalization |
Sleep Mode
Conditions:
| 1) |
Thermal counter decreases to the initial value |
| 2) |
EN = Off |
| 3) |
(10±0.4) passed since the last movement |
Depending on the value of thermal counter, the system turns to the sleep mode after “10” minutes with ignition = off. |
Wake-up
Conditions:
| 1) |
Hardware reset |
| 2) |
EN = On |
Rear Door Curtain Control
Condition:
| 1) |
System reset (Refer to 4.4) |
| 2) |
EN = On |
| 3) |
Window State
|
If above condition is not satisfied, Window State Output is HIGH. |
 Components and Components Location
Component Location
1. DDM (Driver Door Module)2. ADM (Assist Door Module)3. Front window motor4. Rear window motor5. Rear window switch
...
 Power Window Motor Repair procedures
Inspection
Front Power Window Motor
1.
Remove (-) negative battery terminal.
2.
Remove the front door trim.
(Refer to Body - "Front Door")
3.
Disconnect the motor connector from the mot ...
See also:
Fluid Repair procedures
Service Adjustment Procedure
Oil level Check
A check of ATF level is not normally required during
scheduled services. If an oil leak is found, perform the oil level chec ...
Description and Operation
Description
System Overview
The System offers the following features:
-
Human machine interface through a 1-stage button, for terminal switching and engine start.
-
Control of external re ...
Engine And Transmission Assembly Repair procedures
Removal
•
Use fender covers to avoid damaging painted surfaces.
•
To avoid damage, unplug the wiring connectors carefully while holding the connector portion.
...
Categories
Hyundai Equus Manuals

� 2011-2026 Copyright www.heqmanual.com