[Center Fascia Upper Panel]
| • |
Put on gloves to protect your hands. |
|
| • |
When prying with a flat-tip screwdriver, wrap it with
protective tape, and apply protective tape around the related parts, to
prevent damage. |
| • |
Use a plastic panel removal tool to remove interior trim pieces to protect from marring the surface. |
| • |
Take care not to bend or scratch the trim and panels. |
|
| 1. |
Using a screwdriver or remover, remove the cluster fascia upper panel (A). 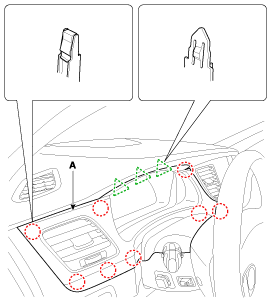
|
| 2. |
Using a screwdriver or remover, remove the center fascia upper panel (A). 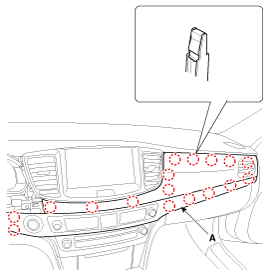
|
| 3. |
Disconnect the heater and A/C controller connector (A) and start connector (B). 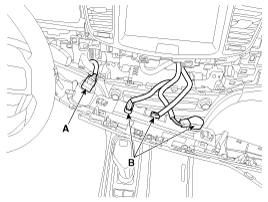
|
| 4. |
Loosen the mounting screws, remove the center fascia complete lower panel (A). 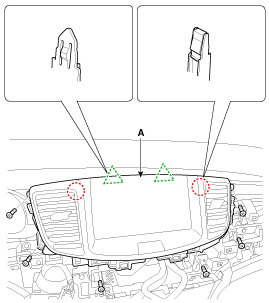
|
| 5. |
Install in the reverse order of removal.
| • |
Make sure the connector is connected properly. |
| • |
Replace any damage clips. |
|
|
[Center Fascia Lower Panel]
| • |
Put on gloves to protect your hands. |
|
| • |
When prying with a flat-tip screwdriver, wrap it with
protective tape, and apply protective tape around the related parts, to
prevent damage. |
| • |
Use a plastic panel removal tool to remove interior trim pieces to protect from marring the surface. |
| • |
Take care not to bend or scratch the trim and panels. |
|
| 1. |
Remove the center fascia upper panel.
(Refer to Crash Pad - "Center Fascia Panel") |
| 2. |
Using a screwdriver or remover, remove the center fascia lower panel (A). 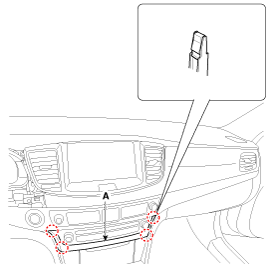
|
| 3. |
Install in the reverse order of removal.
| • |
Make sure the connector is connected properly. |
| • |
Replace any damage clips. |
|
|
[Center Fascia Lower Tray]
| • |
Put on gloves to protect your hands. |
|
| • |
When prying with a flat-tip screwdriver, wrap it with
protective tape, and apply protective tape around the related parts, to
prevent damage. |
| • |
Use a plastic panel removal tool to remove interior trim pieces to protect from marring the surface. |
| • |
Take care not to bend or scratch the trim and panels. |
|
| 1. |
Remove the center fascia upper panel.
(Refer to Crash Pad - "Center Fascia Panel") |
| 2. |
Remove the center fascia lower panel.
(Refer to Crash Pad - "Center Fascia Panel") |
| 3. |
Remove the front console upper complete.
(Refer to Floor Console - "Floor Console Assembly") |
| 4. |
Remove the E-Shifter assembly.
(Refer to Automatic Transmission Control System - "E-Shifter") |
| 5. |
Loosen the mounting screws, remove the center fascia lower tray (A). 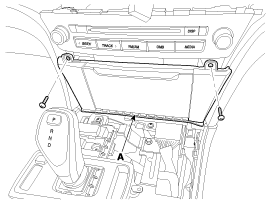
|
| 6. |
Disconnect the lighting connector (A) and USB connector (B) and antenna (C). 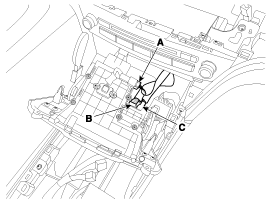
|
| 7. |
Install in the reverse order of removal.
| • |
Make sure the connector is connected properly. |
| • |
Replace any damage clips. |
|
|
Component Location
1. Center fascia upper panel2. Center fascia lower panel
...
Component Location
1. Crash pad lower panel
...
See also:
Description and Operation
Description
Premium AVN system
The premium AVN system has improved information search and
easiness of manipulation for the driver by simplifying the system
operation experience and unifying th ...
Front Door Inside Handle Repair procedures
Replacement
1.
Remove the front door trim.
(Refer to Front Door - "Front Door Trim")
2.
Disconnect the front door inside handle lamp connector (A).
3.
After loosening the mounting screws ...
Hood Lift Repair procedures
Replacement
•
When removing and installing the hood lifter, an assistant is necessary.
•
When removing the clips, use a clip remover.
1.
Using a screwdrive ...
 Hyundai Equus: Center Fascia Panel Repair procedures
Second generation VI (2009–2026) / Hyundai Equus VI 2009-2026 Service Manual / Body (Interior and Exterior) / Crash Pad / Center Fascia Panel Repair procedures
 Center Fascia Panel Components and Components Location
 Crash Pad Lower Panel Components and Components Location


