 Hyundai Equus: Propeller Shaft Repair procedures
Second generation VI (2009–2026) / Hyundai Equus VI 2009-2026 Service Manual / Driveshaft and axle / Propeller Shaft Assembly / Propeller Shaft Repair procedures
Hyundai Equus: Propeller Shaft Repair procedures
Second generation VI (2009–2026) / Hyundai Equus VI 2009-2026 Service Manual / Driveshaft and axle / Propeller Shaft Assembly / Propeller Shaft Repair procedures
Second generation VI (2009–2026) / Hyundai Equus VI 2009-2026 Service Manual / Driveshaft and axle / Propeller Shaft Assembly / Propeller Shaft Repair procedures
| Inspection |
CV Joint and Boots
| 1. |
Shift the transaxle to Neutral. |
| 2. |
Raise the vehicle off the ground, and support it with safety stands in the proper locations. |
| 3. |
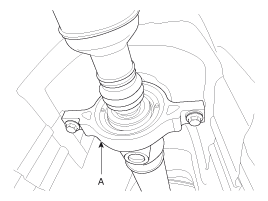
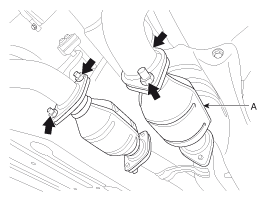
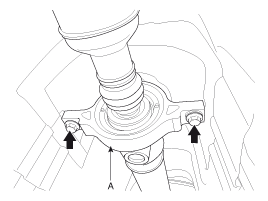
Check the center bearing (A) for excessives play or rattle
and rubber for rent. If the center bearing has excessive play or rattle
and rubber has rent, replace the propeller shaft assembly.
|
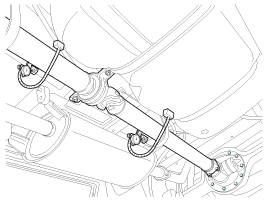
Inspect flexible coupling
| 1. |
Check the front and rear flexible couplings for cracks or damage. |
| 2. |
Inspect the flexible coupling centering bushing.
If the busing is damaged, replace the propel shaft assembly.
|
Propeller shaft runout
| 1. |
Install a dial indicator with its needle on the center of front propeller shaft or rear propeller shaft. |
| 2. |
Turn the propeller shaft slowly and check the runout. Repeat this procedure for the other propeller shaft.
|
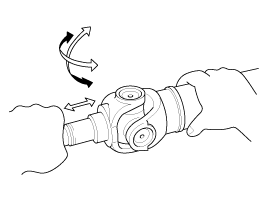
Universal joint inspect
| 1. |
Check that the spider berring rotates smoothly. |
| 2. |
Check that there is no play in the spider bearing if necessary, replace the propel shaft.
|
| Replacement |
| 1. |
loosen the muffler mount nut and then remove the muffler (A).
|
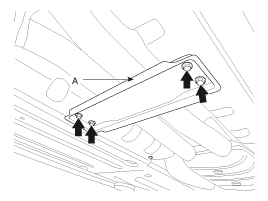
| 2. |
Loosen the mounting bolts and then remove the bracket (A).
|
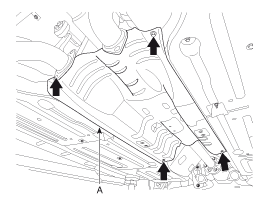
| 3. |
Loosen the mount bolts and then aluminum cover (A).
|
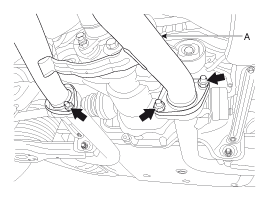
| 4. |
Remove the center bearing bracket (A) mounting bolts.
|
| 5. |
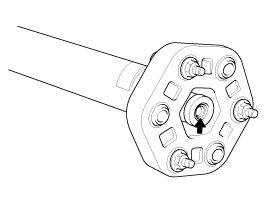
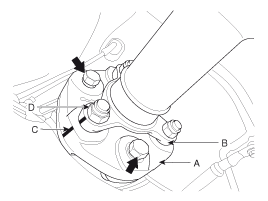
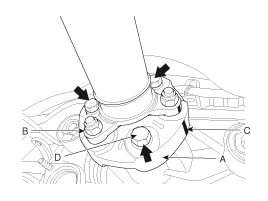
After making a match mark (C) on the rubber coupling (A) and
rear differential companion (B), remove the propeller shaft mounting
bolts (D).
|

| 6. |
Installation is the reverse order of removal. |
 Propeller Shaft Components and Components Location
Components
1. Propeller shaft2. Center bearing bracket
...

See also:
Transmission Control Module (TCM) Schematic Diagrams
1. TCM Connector and Terminal Function
2. TCM Terminal Function
Connector
PinDescriptionPinDescription1Battery power48-2Battery power49-3Power(IG 1)5027 Brake control solenoid valve4Ground51-5G ...
Compressor Description and Operation
Description
The compressor is the power unit of the A/C system.
It is located on the side of engine block and driven by a V-belt of the engine.
The compressor changes low pressure and low tempera ...
Repair procedures
Adjustment
TCM Learning
When shift shock is occurred or parts related with the transmission are replaced, TCM learning should be performed.
In the following case, TCM learning is required.
...
Categories
Hyundai Equus Manuals

© 2011-2026 Copyright www.heqmanual.com