 Hyundai Equus: Forward-Facing child restraints
Second generation VI (2009–2026) / Hyundai Equus 2009-2026 Owners Manual / Safety features of your vehicle / Child restraint system / Forward-Facing child restraints
Hyundai Equus: Forward-Facing child restraints
Second generation VI (2009–2026) / Hyundai Equus 2009-2026 Owners Manual / Safety features of your vehicle / Child restraint system / Forward-Facing child restraints
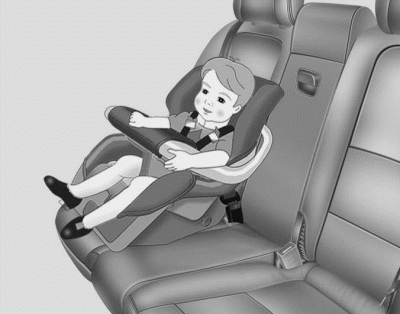
A forward-facing child restraint provides restraint for the child's body with a harness. Keep children in a forwardfacing child restraint with a harness until they reach the top height or weight limit allowed by your child restraint's manufacturer.
Once your child outgrows the forwardfacing child restraint, your child is ready for a booster seat.
WARNING - Child seat installation
- A child can be seriously injured or killed in a collision if the child restraint is not properly anchored to the car and the child is not properly restrained in the child restraint. Before installing the child restraint system, read the instructions supplied by the child restraint system manufacturer.
- If the seat belt does not operate as described in this section, have the system checked immediately by your authorized EQUUS dealer.
- Failure to observe this manual's instructions regarding child restraint systems and the instructions provided with the child restraint system could increase the chance and/or severity of injury in an accident.
Placing a passenger seat belt into the automatic locking mode
The automatic locking mode will help prevent the normal movement of the child in the vehicle from causing the seat belt to loosen and compromise the child restraint system. To secure a child restraint system, use the following procedure.
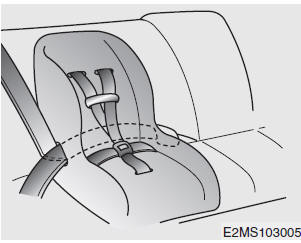
To install a child restraint system on the outboard or center rear seats, do the following:
1. Place the child restraint system on the seat and route the lap/shoulder belt around or through the restraint, following the restraint manufacturer’s instructions. Be sure the seat belt webbing is not twisted.
2. Fasten the lap/shoulder belt latch into the buckle. Listen for the distinct “click” sound.
Position the release button so that it is easy to access in case of an emergency.
3. Pull the shoulder portion of the seat belt all the way out. When the shoulder portion of the seat belt is fully extended, it will shift the retractor to the “Automatic Locking” (child restraint) mode.

4. Slowly allow the shoulder portion of the seat belt to retract and listen for an audible “clicking” or “ratcheting” sound. This indicates that the retractor is in the “Automatic Locking” mode. If no distinct sound is heard, repeat steps 3 and 4.
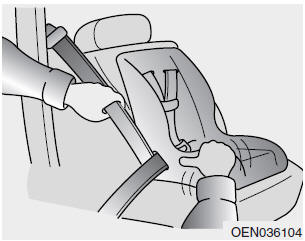
5. Remove as much slack from the belt as possible by pushing down on the child restraint system while feeding the shoulder belt back into the retractor.
6. Push and pull on the child restraint system to confirm that the seat belt is holding it firmly in place. If it is not, release the seat belt and repeat steps 2 through 6.
7. Double check that the retractor is in the “Automatic Locking” mode by attempting to pull more of the seat belt out of the retractor. If you cannot, the retractor is in the “Automatic Locking” mode.
To remove the child restraint, press the release button on the buckle and then pull the lap/shoulder belt out of the restraint and allow the seat belt to retract fully.
WARNING - Automatic locking mode
The lap/shoulder belt automatically returns to the “emergency locking mode” whenever the belt is allowed to retract fully. Therefore, the preceding seven steps must be followed each time a child restraint is installed. If the retractor is not in the Automatic Locking mode, the child restraint can move when your vehicle turns or stops suddenly. A child can be seriously injured or killed if the child restraint is not properly anchored to the car, including setting the retractor to the Automatic Locking mode.
When the seat belt is allowed to retract to its fully stowed position, the retractor will automatically switch from the “Automatic Locking” mode to the emergency lock mode for normal adult usage.
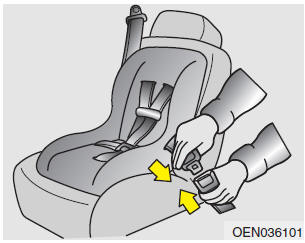
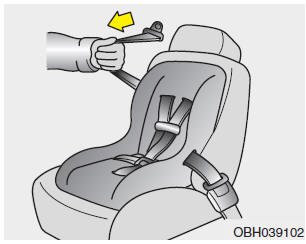
Securing a child restraint seat with “Tether Anchor” system
Child restraint hook holders are located on the package tray.
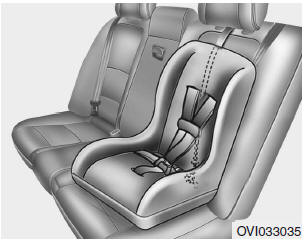
1. Route the child restraint seat tether strap over the seatback. For vehicles with adjustable headrests, route the tether strap under the headrest and between the headrest posts, otherwise route the tether strap over the top of the seatback.
2. Connect the tether strap hook to the appropriate child restraint hook holder and tighten to secure the child restraint seat.
WARNING
A child can be seriously injured or killed in a collision if the child restraint is not properly anchored to the car and the child is not properly restrained in the child restraint. Always follow the child seat manufacturer’s instructions for installation and use.
WARNING - Tether strap
Never mount more than one child restraint to a single tether anchor or to a single lower anchorage point. The increased load caused by multiple seats may cause the tethers or lower anchorage points to break, causing serious injury or death.
WARNING - Child restraint check
Check that the child restraint system is secure by pushing and pulling it in different directions. Incorrectly fitted child restraints may swing, twist, tip or separate causing death or serious injury.
WARNING - Child restraint anchorage
- Child restraint anchorages are designed to withstand only those loads imposed by correctly fitted child restraints. Under no circumstances are they to be used for adult seat belts or harnesses or for attaching other items or equipment to the vehicle.
- The tether strap may not work properly if attached somewhere other than the correct tether anchor.
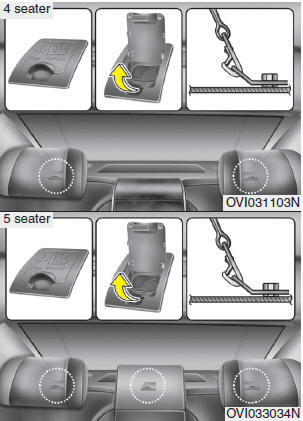
Securing a child restraint seat with child seat lower anchor system
Some child seat manufacturers make child restraint seats that are labeled as LATCH or LATCH-compatible child restraint seats. LATCH stands for "Lower Anchors and Tethers for Children". These seats include two rigid or webbing mounted attachments that connect to two LATCH anchors at specific seating positions in your vehicle. This type of child restraint seat eliminates the need to use seat belts to attach the child seat in the rear seats.

Child restraint symbols are located on the left and right rear seat backs to indicate the position of the lower anchors for child restraints.
WARNING
- When using the vehicle's "LATCH" system to install a child restraint system in the rear seat, all unused vehicle rear seat belt metal latch plates or tabs must be latched securely in their seat belt buckles and the seat belt webbing must be retracted behind the child restraint to prevent the child from reaching and taking hold of unretracted seat belts. Unlatched metal latch plates or tabs may allow the child to reach the unretracted seat belts which may result in strangulation and a serious injury or death to the child in the child restraint.
- Do not place anything around the lower anchors. Also make sure that the seat belt is not caught in the lower anchors.
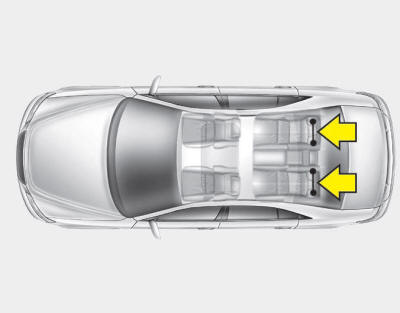
LATCH anchors have been provided in your vehicle. The LATCH anchors are located in the left and right outboard rear seating positions. Their locations are shown in the illustration. There is no LATCH anchor provided for the center rear seating position.
The LATCH anchors are located between the seatback and the seat cushion of the rear seat left and right outboard seating positions.
Follow the child seat manufacturer’s instructions to properly install child restraint seats with LATCH or LATCH-compatible attachments.
Once you have installed the LATCH child restraint, assure that the seat is properly attached to the LATCH and tether anchors.
Also, test the child restraint seat before you place the child in it. Tilt the seat from side to side. Also try to tug the seat forward. Check to see if the anchors hold the seat in place.
CAUTION
Do not allow the rear seat belt webbing to get scratched or pinched by the child-seat latch and LATCH anchor during the installation.
WARNING
If the child restraint is not anchored properly, the risk of a child being seriously injured or killed in a collision greatly increases.
WARNING - LATCH lower anchors
LATCH lower anchors are only to be used with the left and right rear outboard seating positions. Never attempt to attach a LATCH equipped seat in the center seating position. You may damage the anchors or the anchors may fail and break in a collision.
 Rear-Facing child restraint
WARNING
NEVER install a child or infant restraint in the front passenger's seat. Placing
a rear-facing child restraint in the front seat can result in SERIOUS INJURY or
DEATH if the child ...
 Air bag
(1) Driver’s front air bag
(2) Passenger’s front air bag
(3) Side impact air bag
(4) Curtain air bag
(5) Driver’s knee air bag
WARNING
Even in vehicles with air bags, you and your passen ...
See also:
Transmission Oil Temperature Sensor Specifications
Specifications
x Type: Negative Thermal Coefficient Type
Temp.[(°C)°F]Resistance (kx)(-40)-40139.5(-20)-4.047.4(0)32.018.6(20)68.08.1(40)104.03.8(60)140.01.98(80)176.01.08(100)212.00.63(120)2 ...
Underdrive Brake Control Solenoid Valve(UD/B_VFS) Specifications
Specifications
Direct control VFS[UD/C]
x Control type : Normal low type
Control Pressure kpa (kgf/cmx, psi)0~1569.06 (0~16,0~227.57)Current value(mA)0~1100 Internal resistance ...
Specifications
Specifications
ItemsSpecificationsRated voltageDC 12VOperating voltageDC 9 ~ 16VOperating temperature-30°C ~ 75°C (-4°F ~ 158°F)Dark current4.5 mA
...
Categories
Hyundai Equus Manuals
