 Hyundai Equus: Evaporator Core Repair procedures
Second generation VI (2009–2026) / Hyundai Equus VI 2009-2026 Service Manual / Heating, Ventilation and Air Conditioning / Heater / Evaporator Core Repair procedures
Hyundai Equus: Evaporator Core Repair procedures
Second generation VI (2009–2026) / Hyundai Equus VI 2009-2026 Service Manual / Heating, Ventilation and Air Conditioning / Heater / Evaporator Core Repair procedures
Second generation VI (2009–2026) / Hyundai Equus VI 2009-2026 Service Manual / Heating, Ventilation and Air Conditioning / Heater / Evaporator Core Repair procedures
| Replacement |
| 1. |
Disconnect the negative (-) battery terminal. |
| 2. |
Remove the heater and blower assembly.
(Refer to Heater -"Heater Unit") |
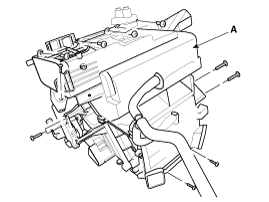
| 3. |
Remove the heater unit lower case (A) after loosening the mounting screws.
|
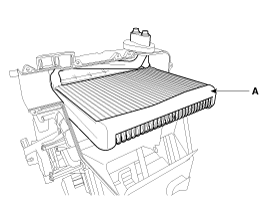
| 4. |
Pull out the evaporator core (A) from the heater unit.
|

| 5. |
Install in the reverse order of removal.
|
 Heater Core Repair procedures
Replacement
1.
Disconnect the negative (-) battery terminal.
2.
Remove the heater and blower assembly.
(Refer to Heater -"Heater Unit")
3.
Remove the heater core cover (A) after loosening ...
 Temperature Control Actuator Description and Operation
Description
The temperature control actuator is located at the heater unit. It regulates the temperature by the procedure as follows.
The signal from the control unit adjusts the position of the ...
See also:
Panic Button
Press the Panic button (4) for more than one second. The horn sounds and hazard
warning lights flash for about 30 seconds.
To cancel the panic mode, press any button on the Smart Key. ...
Fuel Pump Control Module (FPCM) Schematic Diagrams
Circuit Diagram
...
Rail Pressure Sensor (RPS) Description and Operation
Description
Rail Pressure Sensor (RPS) is installed on the delivery pipe
and measures the instantaneous fuel pressure in the delivery pipe. The
sensing element (Semiconductor element) built in ...
Categories
Hyundai Equus Manuals

© 2011-2026 Copyright www.heqmanual.com