
 Hyundai Equus: Center Pillar Trim Repair procedures
Second generation VI (2009–2026) / Hyundai Equus VI 2009-2026 Service Manual / Body (Interior and Exterior) / Interior Trim / Center Pillar Trim Repair procedures
Hyundai Equus: Center Pillar Trim Repair procedures
Second generation VI (2009–2026) / Hyundai Equus VI 2009-2026 Service Manual / Body (Interior and Exterior) / Interior Trim / Center Pillar Trim Repair procedures
Second generation VI (2009–2026) / Hyundai Equus VI 2009-2026 Service Manual / Body (Interior and Exterior) / Interior Trim / Center Pillar Trim Repair procedures
| Replacement |
[Center Pillar Lower Trim]
|

|

| 1. |
Remove the front door scuff trim.
(Refer to Interior Trim - "Door Scuff Trim") |
| 2. |
Remove the rear door scuff trim.
(Refer to Interior Trim - "Door Scuff Trim") |
| 3. |
Slighty remove the front door body side weatherstrip. |
| 4. |
Slighty remove the rear door body side weatherstrip. |
| 5. |
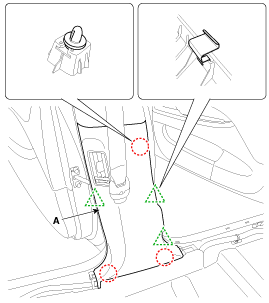
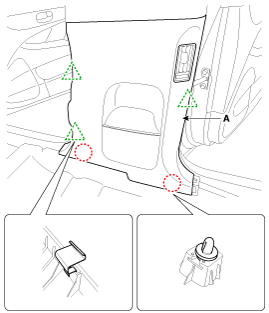
Using a screwdriver or remover, remove the center pillar lower trim (A).
[Sadan]
[Limousine]
|
| 6. |
Install in the reverse order of removal.
|

[Center Pillar Upper Trim]
|
|
| 1. |
Remove the center pillar lower trim.
(Refer to Interior Trim - "Center Pillar Trim") |
| 2. |
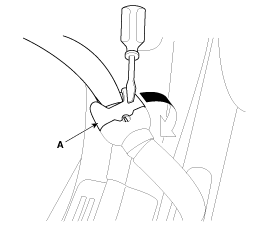
Remove the safety belt (A) by turning it in the direction of arrow using a flathead screwdriver(-).
[Passenger's]
|
| 3. |
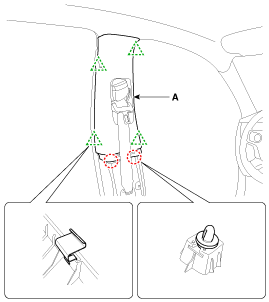
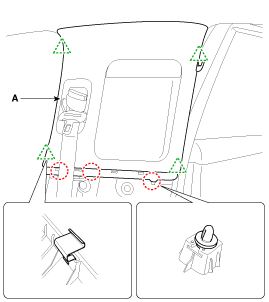
Using a screwdriver or remover, remove the center pillar upper trim (A).
[Sadan]
[Limousine]
|
| 4. |
Install in the reverse order of removal.
|
 Center Pillar Trim Components and Components Location
Component Location
1. Center pillar lower trim2.Center pillar upper trim
...
 Rear Pillar Trim Components and Components Location
Component Location
1. Rear pillar trim
...
See also:
Head Lamps Components and Components Location
Components
1. Head lamp assembly lens & housing2. Ballast3. Head lamp (Low) bulb (HID) & Ignitor4. Bracket5. Dust cover (Low)6. Vertical adjustment (High/Low)7. Head lamp (High) bulb8. Du ...
Windshield defrosting and defogging
WARNING - Windshield heating
Do not use the or
position during cooling operation
in extremely humid weather. The difference between the temperature of the outside
air and that of the windshiel ...
Purge Control Solenoid Valve (PCSV) Repair procedures
Inspection
1.
Turn the ignition switch OFF.
2.
Disconnect the PCSV connector.
3.
Measure resistance between the PCSV terminals 1 and 2.
4.
Check that the resistance is within the speci ...
Categories
Hyundai Equus Manuals

© 2011-2026 Copyright www.heqmanual.com