 Hyundai Equus: Waist Line Molding Repair procedures
Second generation VI (2009–2026) / Hyundai Equus VI 2009-2026 Service Manual / Body (Interior and Exterior) / Body Side Molding / Waist Line Molding Repair procedures
Hyundai Equus: Waist Line Molding Repair procedures
Second generation VI (2009–2026) / Hyundai Equus VI 2009-2026 Service Manual / Body (Interior and Exterior) / Body Side Molding / Waist Line Molding Repair procedures
Second generation VI (2009–2026) / Hyundai Equus VI 2009-2026 Service Manual / Body (Interior and Exterior) / Body Side Molding / Waist Line Molding Repair procedures
| Replacement |
|

|

| 1. |
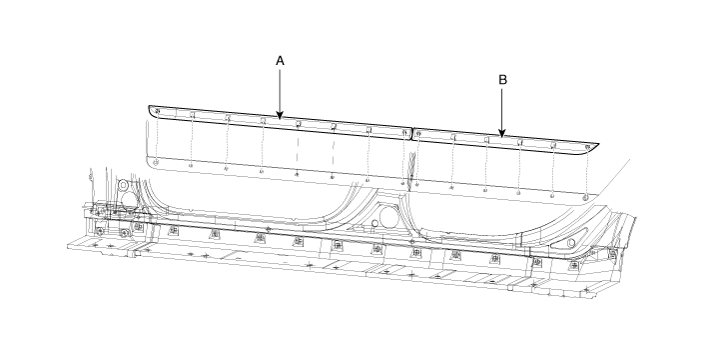
Using a screwdriver or remover, remove the front waist line molding (A). |
| 2. |
Using a screwdriver or remover, remove the rear waist line molding (B).
|
| 3. |
Install in the reverse order of removal.
|

 Rear Wheel Guard Repair procedures
Replacement
•
Put on gloves to protect your hands.
•
When prying with a flat-tip screwdriver, wrap it with
protective tape, and apply p ...
 Side Sill Molding Repair procedures
Replacement
•
Put on gloves to protect your hands.
•
When prying with a flat-tip screwdriver, wrap it with
protective tape, and apply p ...
See also:
Injector Repair procedures
Inspection
1.
Turn the ignition switch OFF.
2.
Disconnect the injector connector.
3.
Measure resistance between the injector terminals 1 and 2.
4.
Check that the resistance is within t ...
Components and Components Location
Component Location
1 . Front PAS sensor (4EA)2 . Rear PAS sensor (4EA)3. Indicator (warning information displayed on LCD)4 . Parking Assist System (PAS) switch5 . Body Control Module (BCM)6. Clus ...
ECU Repair procedures
Removal
•
Avoid suffering excessive impact.
•
Do not entering the water into pin inside.
•
Do not pile up the parts.
•
Take care not to damage the ...
Categories
Hyundai Equus Manuals

© 2011-2026 Copyright www.heqmanual.com