 Hyundai Equus: Door Scuff Trim Repair procedures
Second generation VI (2009–2026) / Hyundai Equus VI 2009-2026 Service Manual / Body (Interior and Exterior) / Interior Trim / Door Scuff Trim Repair procedures
Hyundai Equus: Door Scuff Trim Repair procedures
Second generation VI (2009–2026) / Hyundai Equus VI 2009-2026 Service Manual / Body (Interior and Exterior) / Interior Trim / Door Scuff Trim Repair procedures
Second generation VI (2009–2026) / Hyundai Equus VI 2009-2026 Service Manual / Body (Interior and Exterior) / Interior Trim / Door Scuff Trim Repair procedures
| Replacement |
[Front Door Scuff Trim]
|

|

| 1. |
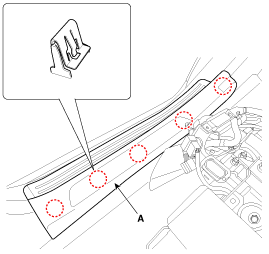
Using a screwdriver or remover, remove the front door scuff tirm (A).
|

| 2. |
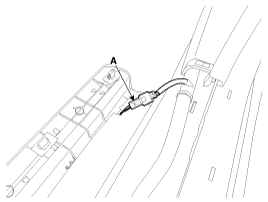
Disconnect the front door scuff lamp connector (A).
|
| 3. |
Install in the reverse order of removal.
|

[Rear Door Scuff Trim]
|
|
| 1. |
Using a screwdriver or remover, remove the rear door scuff tirm (A).
|
| 2. |
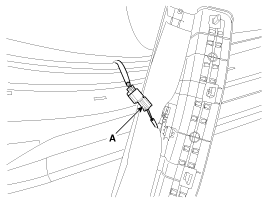
Disconnect the rear door scuff lamp connector (A).
|
| 3. |
Install in the reverse order of removal.
|
 Door Scuff Trim Components and Components Location
Component Location
1. Front door scuff trim2. Rear door scuff trim
...
 Cowl Side Trim Components and Components Location
Component Location
1. Cowl side trim
...
See also:
Power Steering Motor Components and Components Location
Components
1. Oil reservoir2. Gear pump3. Motor4. ECU
...
Alternator Schematic Diagrams
Circuit Diagram
•
COM signal - When
controlling the voltage generated, the ECM sends the target voltage data
to the alternator via a PWM signal.(High voltage: 4V or h ...
Hill-start assist control (HAC)
A vehicle has the tendency to roll back on a steep hill when the driver begins
to accelerate after a stop. The Hill-start Assist Control (HAC) prevents the vehicle
from rolling back by operating t ...
Categories
Hyundai Equus Manuals

© 2011-2026 Copyright www.heqmanual.com