 Hyundai Equus: G Sensor Repair procedures
Second generation VI (2009–2026) / Hyundai Equus VI 2009-2026 Service Manual / Suspension System / Air Suspension System / G Sensor Repair procedures
Hyundai Equus: G Sensor Repair procedures
Second generation VI (2009–2026) / Hyundai Equus VI 2009-2026 Service Manual / Suspension System / Air Suspension System / G Sensor Repair procedures
Second generation VI (2009–2026) / Hyundai Equus VI 2009-2026 Service Manual / Suspension System / Air Suspension System / G Sensor Repair procedures
| Removal |
|

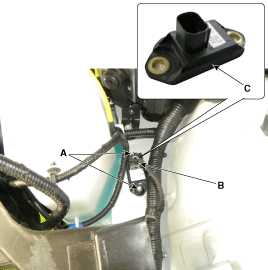
G-sensor FL
| 1. |
Remove the front bumper.
(Refer to Body- "Front Bumper Cover") |
| 2. |
Remove the left head lamp.
(Refer to Body Electrical System- "Head Lamps") |
| 3. |
Disconnect the connector (B) and nut (A-2ea) remove the G-sensor (C).
|
| 4. |
Install in the reverse order of removal. |
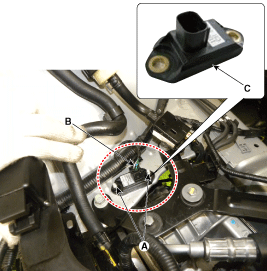
G-sensor FR
| 1. |
Remove the air cleaner assembly.
(Refer to Engine Mechanical System - "Exhaust Manifold") |
| 2. |
Disconnect the connector (B) and nut (A-2ea) remove the G-sensor (C).
|
| 3. |
Install in the reverse order of removal. |
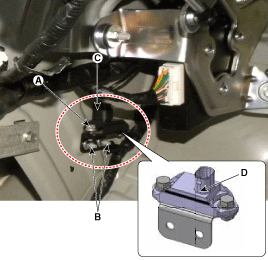
G-sensor RL
| 1. |
Remove the trunk trim.
(Refer to Body - "Trunk Trim") |
| 2. |
Remove the luggage side trim on the left.
(Refer to Body - "Trunk Trim") |
| 3. |
Loosen the bolt (A-2ea) and bracket nut (B-2ea) and disconnect connector (C) remove the G-sensor (D).
|
| 4. |
Install in the reverse order of removal. |
 G Sensor Schematic Diagrams
Circuit diagram
1.
G-sensor connector
2.
G-sensor terminal function
NoFunction1Signal2Ground3Power(5V)
3.
Circuit diagram ...
 Lower Arm Repair procedures
Removal
[Front Lower Arm]
Replacement the lateral arm
1.
Removal the front wheel & tire.
Tightening torque :
90.0 ~ 110.0 N.m(9.0 ~ 11.0 kgf.m, 65.0 ~ 80.0 lb-ft)
2.
Disconnect ...
See also:
Smart Cruise Control Switch Repair procedures
Inspection
[Measuring Resistance]
1.
Disconnect the cruise control switch connector from the control switch.
2.
Measure resistance between terminals on the control switch when each function ...
Sunvisor Repair procedures
Replacement
•
When prying with a flat-tip screwdriver, wrap it with
protective tape, and apply protective tape around the related parts, to
prevent damage.
•
...
Knock Sensor (KS) Schematic Diagrams
Circuit Diagram
...
Categories
Hyundai Equus Manuals

© 2011-2026 Copyright www.heqmanual.com