
 Hyundai Equus: Power Trunk Module Drive Unit Repair procedures
Second generation VI (2009–2026) / Hyundai Equus VI 2009-2026 Service Manual / Body Electrical System / Power Trunk Module / Power Trunk Module Drive Unit Repair procedures
Hyundai Equus: Power Trunk Module Drive Unit Repair procedures
Second generation VI (2009–2026) / Hyundai Equus VI 2009-2026 Service Manual / Body Electrical System / Power Trunk Module / Power Trunk Module Drive Unit Repair procedures
Second generation VI (2009–2026) / Hyundai Equus VI 2009-2026 Service Manual / Body Electrical System / Power Trunk Module / Power Trunk Module Drive Unit Repair procedures
| Removal |
|

| 1. |
Disconnect the negative (-) battery terminal. |
| 2. |
Remove the left trunk trim in the trunk. (Refer to the Body group - "Trunk") |
| 3. |
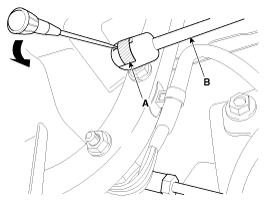
Remove the power trunk connecting rod (B) after removing the push rod pin (A).
|

| 4. |
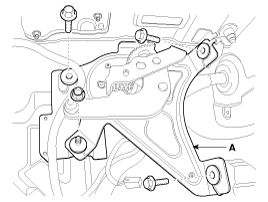
Remove the power trunk module & drive unit (A) after removing the bolts, nut and connector.
|
| Installation |
| 1. |
Install the power trunk module & drive unit.
|
| 2. |
Install the push rod to the ball joint. |
| 3. |
Connect the connector (18P). |
| 4. |
Install the left trunk trim. |
| 5. |
Connect the negative (-) battery terminal and check the power trunk module correctly.
|

 Power Trunk Module Drive Unit Schematic Diagrams
Circuit Diagram
...
 Power Latch Repair procedures
Removal
1.
Disconnect the negative (-) battery terminal.
2.
Remove the trunk trim in the trunk.
(Refer to Body - "Trunk")
3.
Remove the power latch (A) after removing the bolts (2EA) and ...
See also:
Troubleshooting
Troubleshooting
•
The battery must be in good condition and fully charged for this troubleshooting.
...
Head Lamps Components and Components Location
Components
1. Head lamp assembly lens & housing2. Ballast3. Head lamp (Low) bulb (HID) & Ignitor4. Bracket5. Dust cover (Low)6. Vertical adjustment (High/Low)7. Head lamp (High) bulb8. Du ...
Repair procedures
Inspection
Check it by the procedure below to see if the function of the ECM is normal.
1.
Turn the ignition key to the "ON" position.
2.
Cover the front looking sensor to stop functioning.
...
Categories
Hyundai Equus Manuals

© 2011-2026 Copyright www.heqmanual.com