 Hyundai Equus: Steering Wheel Remote Controller (SWRC) Repair procedures
Second generation VI (2009–2024) / Hyundai Equus VI 2009-2024 Service Manual / Body Electrical System / Premium AVN System / Steering Wheel Remote Controller (SWRC) Repair procedures
Hyundai Equus: Steering Wheel Remote Controller (SWRC) Repair procedures
Second generation VI (2009–2024) / Hyundai Equus VI 2009-2024 Service Manual / Body Electrical System / Premium AVN System / Steering Wheel Remote Controller (SWRC) Repair procedures
Second generation VI (2009–2024) / Hyundai Equus VI 2009-2024 Service Manual / Body Electrical System / Premium AVN System / Steering Wheel Remote Controller (SWRC) Repair procedures
| Inspection |
| 1. |
Check for resistance between terminals in each switch position.
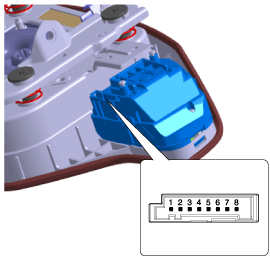
[LH Top (Audio)]
|
| 2. |
Check for resistance between terminals in each switch position.
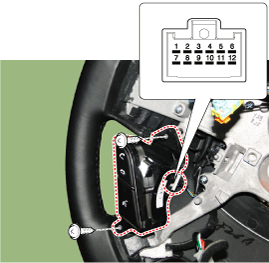
[LH Bottom (B/T+LDWS+Mute)]
|
| 3. |
Check for resistance between terminals in each switch position.
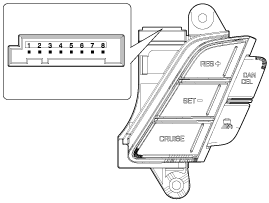
[RH Bottom (Cruise)]
|
Inspection using GDS
| 1. |
The SWRCe can diagnose by using the GDS more quickly.
The BCM communicates with the GDS and then reads the input/output value and drives the actuator. |
| 2. |
To diagnose the SWRC function, select the menu of model and body control module. |
| 3. |
Select "Input/output monitoring", if you will check current
data of body network system. It provides input/output status of each
module. |
| Removal |
| 1. |
Disconnect the negative (-) battery terminal. |
| 2. |
Remove the driver airbag module.
(Refer to Restraint - "Driver Airbag (DAB) Module and Clock Spring") |
| 3. |
Remove the TORX screws to remove the fixed bracket.
|
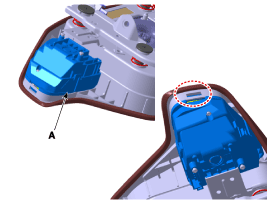
| 4. |
Remove the remote control swich screws to remove the fixed bracket.
|
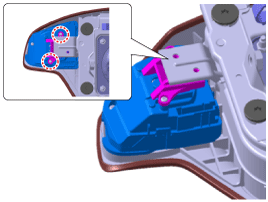
| 5. |
Remove the service block bracket (A) by sliding it.
|
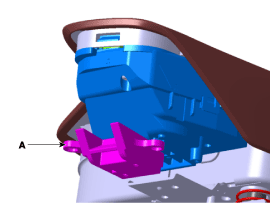
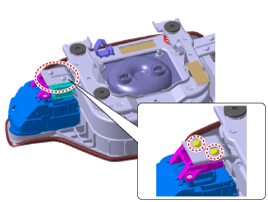
| 6. |
Remove the steering wheel remote control switch (A) after releasing the fixed hook carefully.
|
| Installation |
| 1. |
Install teh steering wheel remote control after connecting the connector. |
| 2. |
Install the driver airbag module. |
| 3. |
Connect the negative (-) battery terminal. |
 Steering Wheel Remote Controller (SWRC) Description and Operation
Description
The steering wheel remote controller (SWR) is composed of
four switches and the right top switch is equipped with the Body CAN
communication module.
The left bottom remote control ...
 Steering Wheel Remote Controller (SWRC) Troubleshooting
Initialization and Troubleshooting Procedures
1.
Initialization Procedure
: Disconnect (connector or battery) for 30 seconds (time required for internal condenser discharge), then reconnect the p ...
See also:
Panic Button
Press the Panic button (4) for more than one second. The horn sounds and hazard
warning lights flash for about 30 seconds.
To cancel the panic mode, press any button on the Smart Key. ...
Horn
To sound the horn, press the area indicated by the horn symbol on your steering
wheel (see illustration). The horn will operate only when this area is pressed.
CAUTION
Do not strike the horn s ...
Components and Components Location
Components
1. Cowl side trim2. Front door scuff trim3. Center pillar lower trim4. Rear door scuff trim5. Rear pillar trim6. Rear wheel house trim7. Rear package tray trim 8. Front pillar trim
...
Categories
Hyundai Equus Manuals

© 2011-2024 Copyright www.heqmanual.com