 Hyundai Equus: Seat Belt Pretensioner (BPT) Repair procedures
Second generation VI (2009–2024) / Hyundai Equus VI 2009-2024 Service Manual / Restraint / Seat Belt Pretensioner / Seat Belt Pretensioner (BPT) Repair procedures
Hyundai Equus: Seat Belt Pretensioner (BPT) Repair procedures
Second generation VI (2009–2024) / Hyundai Equus VI 2009-2024 Service Manual / Restraint / Seat Belt Pretensioner / Seat Belt Pretensioner (BPT) Repair procedures
Second generation VI (2009–2024) / Hyundai Equus VI 2009-2024 Service Manual / Restraint / Seat Belt Pretensioner / Seat Belt Pretensioner (BPT) Repair procedures
| Removal |
| 1. |
Disconnect the battery negative cable, and wait for at least three minutes before beginning work. |
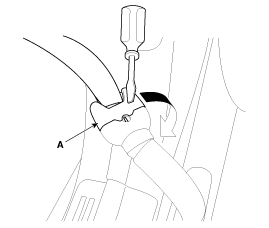
| 2. |
Remove the safety belt (A) by turning it in the direction of arrow using a flat-head screwdriver.
|
| 3. |
Remove the center pillar lower trim.
(Refer to Body - "Center Pillar Trim") |
| 4. |
Remove the center pillar upper trim.
(Refer to Body - "Center Pillar Trim") |
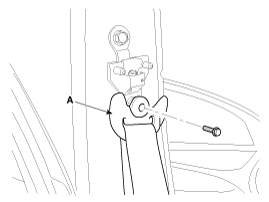
| 5. |
After loosening the mounting bolt, then remove the front seat belt lower anchor (A).
|
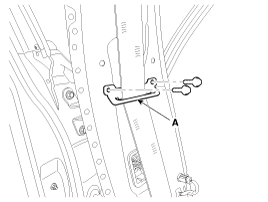
| 6. |
Loosen the front seat belt webbing guide (A) mounting bolts.
|
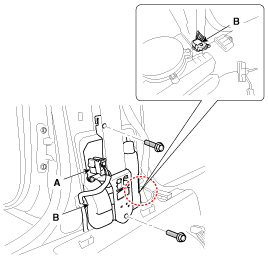
| 7. |
After disconnecting the pretensioner connector lock pin,
remove the front seat belt pretensioner connectors (A), loosen the
mounting bolts, then remove the front seat belt pretensioner (B).
|
| Installation |
| 1. |
Turn the ignition switch OFF. |
| 2. |
Disconnect the battery negative cable and wait for at least three minutes. |
| 3. |
Install in the reverse order of removal. |
| 4. |
Reconnect the battery negative cable. |
| 5. |
After installing the seat belt pretensioner, confirm proper system operation:
Turn the ignition switch ON; the SRS indicator light should turn on for about six seconds and then go off. |

 Emergency Fastening Device (EFD) Description and Operation
Description
The Emergency Fastening Device (EFD) operates at the same
time with the Seat Belt Pretensioner when it satisifies the deployment
condition after a collision. It is an auxiliary equi ...
See also:
4&OD Clutch Control Solenoid Valve Schematic Diagrams
Circuit Diagram
...
Tire and loading information label
The label located on the driver's door sill gives the original tire size, cold
tire pressures recommended for your vehicle, the number of people that can be in
your vehicle and vehicle cap ...
Outside Rear View Mirror Components and Components Location
Component Location
1. Outside rear view mirror
...
Categories
Hyundai Equus Manuals

© 2011-2024 Copyright www.heqmanual.com