 Hyundai Equus: Rear Pillar Trim Repair procedures
Second generation VI (2009Ц2024) / Hyundai Equus VI 2009-2024 Service Manual / Body (Interior and Exterior) / Interior Trim / Rear Pillar Trim Repair procedures
Second generation VI (2009Ц2024) / Hyundai Equus VI 2009-2024 Service Manual / Body (Interior and Exterior) / Interior Trim / Rear Pillar Trim Repair procedures
| Replacement |
|
|
| 1. |
Remove the rear seat cushion assembly.
(Refer to Rear Seat - "Rear Seat Assembly") |
| 2. |
Remove the rear seat back assembly.
(Refer to Rear Seat - "Rear Seat Assembly") |
| 3. |
Remove the rear door scuff trim.
(Refer to Interior Trim - "Door Scuff Trim") |
| 4. |
Slighty remove the rear door body side weatherstrip. |
| 5. |
Remove the rear wheel house trim.
(Refer to Interior Trim - "Rear Wheel House Trim") |
| 6. |
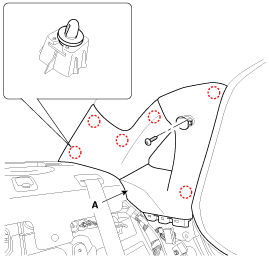
Using a screwdriver or remover, remove the rear pillar trim (A).
|
| 7. |
Install in the reverse order of removal.
|
 Rear Pillar Trim Components and Components Location
Component Location
1. Rear pillar trim
...
 Rear Wheel House Trim Components and Components Location
Component Location
1. Rear wheel house trim
...
See also:
Components and Components Location
Components Location
1. PCV Valve2. Canister3. Purge Control Solenoid Valve (PCSV)4. Fuel Tank Pressure Sensor (FTPS)5. Canister Close Valve (CCV)6. Fuel Level Sensor (FLS)7. Fuel Tank Air Filt ...
Components and Components Location
Components
1. Receiver
...
Cylinder Head Repair procedures
Removal
Х
Use fender covers to avoid damaging painted surfaces.
Х
To avoid damaging the cylinder head, wait until the engine
coolant temperature drops below normal ...
Categories
Hyundai Equus Manuals
© 2011-2024 Copyright www.heqmanual.com


