 Hyundai Equus: Rear Package Tray Trim Repair procedures
Second generation VI (2009–2024) / Hyundai Equus VI 2009-2024 Service Manual / Body (Interior and Exterior) / Interior Trim / Rear Package Tray Trim Repair procedures
Hyundai Equus: Rear Package Tray Trim Repair procedures
Second generation VI (2009–2024) / Hyundai Equus VI 2009-2024 Service Manual / Body (Interior and Exterior) / Interior Trim / Rear Package Tray Trim Repair procedures
Second generation VI (2009–2024) / Hyundai Equus VI 2009-2024 Service Manual / Body (Interior and Exterior) / Interior Trim / Rear Package Tray Trim Repair procedures
| Replacement |
|

|

| 1. |
Remove the rear seat cushion assembly.
(Refer to Rear Seat - "Rear Seat Assembly") |
| 2. |
Remove the rear seat back assembly.
(Refer to Rear Seat - "Rear Seat Assembly") |
| 3. |
Remove the rear door scuff trim.
(Refer to Interior Trim - "Door Scuff Trim") |
| 4. |
Remove the rear wheel house trim.
(Refer to Interior Trim - "Rear Wheel House Trim") |
| 5. |
Remove the rear pillar trim.
(Refer to Interior Trim - "Rear Wheel House Trim") |
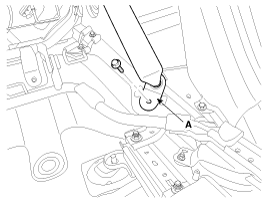
| 6. |
After loosening the mounting bolt, then remove the rear seat belt lower anchor (A).
[LH, RH]
|
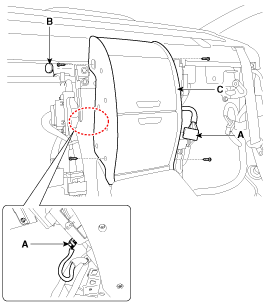
| 7. |
Disconnect the connectors (A). |
| 8. |
Remove the caps (B). |
| 9. |
After loosening the mounting bolts, remove the rear tower console complete assembly (C).
|
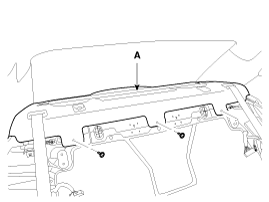
| 10. |
After loosening the mounting screws, then remove the rear package tray trim (A).
|
| 11. |
Install in the reverse order of removal.
|

 Rear Package Tray Trim Components and Components Location
Component Location
1. Rear package tray trim
...
 Trunk Trim
...
See also:
Heated Steering wheel Components and Components Location
Components Location
1. heated steering switch
...
Line Pressure Control Solenoid Vale Schematic Diagrams
Circuit Diagram
...
27 Brake Control Solenoid Valve Description and Operation
Description
27 Brake control solenoid valve is attached to the valve
body. This variable force solenoid valve directly controls the hydraulic
pressure inside the 27 Brake. ...
Categories
Hyundai Equus Manuals

© 2011-2024 Copyright www.heqmanual.com