 Hyundai Equus: Rear Pillar Trim Repair procedures
Second generation VI (2009–2024) / Hyundai Equus VI 2009-2024 Service Manual / Body (Interior and Exterior) / Interior Trim / Rear Pillar Trim Repair procedures
Hyundai Equus: Rear Pillar Trim Repair procedures
Second generation VI (2009–2024) / Hyundai Equus VI 2009-2024 Service Manual / Body (Interior and Exterior) / Interior Trim / Rear Pillar Trim Repair procedures
Second generation VI (2009–2024) / Hyundai Equus VI 2009-2024 Service Manual / Body (Interior and Exterior) / Interior Trim / Rear Pillar Trim Repair procedures
| Replacement |
|

|

| 1. |
Remove the rear seat cushion assembly.
(Refer to Rear Seat - "Rear Seat Assembly") |
| 2. |
Remove the rear seat back assembly.
(Refer to Rear Seat - "Rear Seat Assembly") |
| 3. |
Remove the rear door scuff trim.
(Refer to Interior Trim - "Door Scuff Trim") |
| 4. |
Slighty remove the rear door body side weatherstrip. |
| 5. |
Remove the rear wheel house trim.
(Refer to Interior Trim - "Rear Wheel House Trim") |
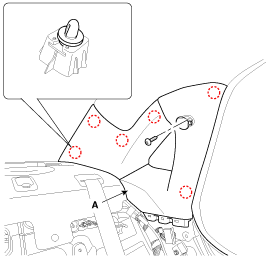
| 6. |
Using a screwdriver or remover, remove the rear pillar trim (A).
|
| 7. |
Install in the reverse order of removal.
|

 Rear Pillar Trim Components and Components Location
Component Location
1. Rear pillar trim
...
 Rear Wheel House Trim Components and Components Location
Component Location
1. Rear wheel house trim
...
See also:
Repair procedures
Operation and Leakage Check
Check all of the following items
ComponentProcedureBrake Booster (A)Check brake operation by applying the brakes during a test
drive. If the brakes do not work proper ...
AUX jack Schematic Diagrams
Circuit Diagram
...
Damper Clutch Control Solenoid Valve Description and Operation
Description
Damper Clutch control solenoid valve is attached to the valve
body. This variable force solenoid valve directly controls the
hydraulic pressure inside the Damper Clutch. ...
Categories
Hyundai Equus Manuals

© 2011-2024 Copyright www.heqmanual.com