 Hyundai Equus: Waist Line Molding Repair procedures
Second generation VI (2009–2024) / Hyundai Equus VI 2009-2024 Service Manual / Body (Interior and Exterior) / Body Side Molding / Waist Line Molding Repair procedures
Hyundai Equus: Waist Line Molding Repair procedures
Second generation VI (2009–2024) / Hyundai Equus VI 2009-2024 Service Manual / Body (Interior and Exterior) / Body Side Molding / Waist Line Molding Repair procedures
Second generation VI (2009–2024) / Hyundai Equus VI 2009-2024 Service Manual / Body (Interior and Exterior) / Body Side Molding / Waist Line Molding Repair procedures
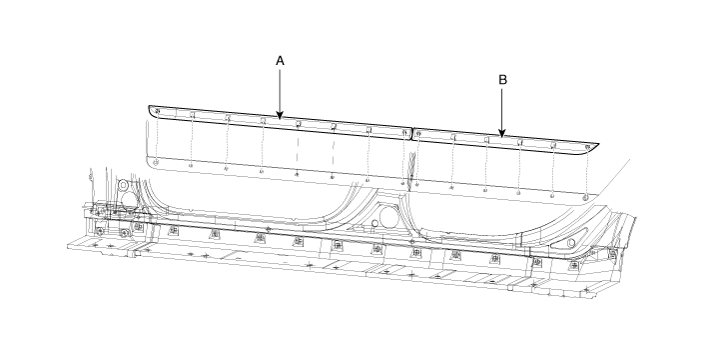
| Replacement |
|

|

| 1. |
Using a screwdriver or remover, remove the front waist line molding (A). |
| 2. |
Using a screwdriver or remover, remove the rear waist line molding (B).
|
| 3. |
Install in the reverse order of removal.
|

 Rear Wheel Guard Repair procedures
Replacement
•
Put on gloves to protect your hands.
•
When prying with a flat-tip screwdriver, wrap it with
protective tape, and apply prote ...
 Side Sill Molding Repair procedures
Replacement
•
Put on gloves to protect your hands.
•
When prying with a flat-tip screwdriver, wrap it with
protective tape, and apply prote ...
See also:
Cylinder Block Repair procedures
Disassembly
Engine removal is required for this procedure.
•
Use fender covers to avoid damaging painted surfaces.
•
To avoid damage, unplug the wiring connectors ca ...
Crankshaft Position Sensor (CKPS) Troubleshooting
Signal Waveform
This example shows a typical Crankshaft Position Sensor (CKPS) and Camshaft Position Sensor (CMPS) waveform at idle. ...
BlueLink Control Switch Components and Components Location
Components
...
Categories
Hyundai Equus Manuals

© 2011-2024 Copyright www.heqmanual.com