 Hyundai Equus: G Sensor Repair procedures
Second generation VI (2009–2026) / Hyundai Equus VI 2009-2026 Service Manual / Suspension System / Air Suspension System / G Sensor Repair procedures
Hyundai Equus: G Sensor Repair procedures
Second generation VI (2009–2026) / Hyundai Equus VI 2009-2026 Service Manual / Suspension System / Air Suspension System / G Sensor Repair procedures
Second generation VI (2009–2026) / Hyundai Equus VI 2009-2026 Service Manual / Suspension System / Air Suspension System / G Sensor Repair procedures
| Removal |
|

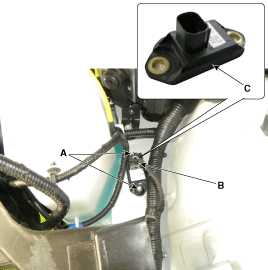
G-sensor FL
| 1. |
Remove the front bumper.
(Refer to Body- "Front Bumper Cover") |
| 2. |
Remove the left head lamp.
(Refer to Body Electrical System- "Head Lamps") |
| 3. |
Disconnect the connector (B) and nut (A-2ea) remove the G-sensor (C).
|
| 4. |
Install in the reverse order of removal. |
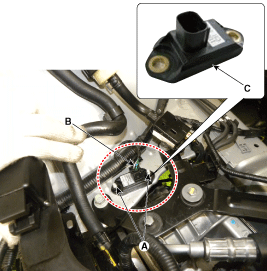
G-sensor FR
| 1. |
Remove the air cleaner assembly.
(Refer to Engine Mechanical System - "Exhaust Manifold") |
| 2. |
Disconnect the connector (B) and nut (A-2ea) remove the G-sensor (C).
|
| 3. |
Install in the reverse order of removal. |
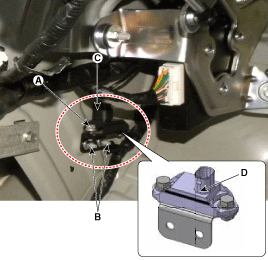
G-sensor RL
| 1. |
Remove the trunk trim.
(Refer to Body - "Trunk Trim") |
| 2. |
Remove the luggage side trim on the left.
(Refer to Body - "Trunk Trim") |
| 3. |
Loosen the bolt (A-2ea) and bracket nut (B-2ea) and disconnect connector (C) remove the G-sensor (D).
|
| 4. |
Install in the reverse order of removal. |
 G Sensor Schematic Diagrams
Circuit diagram
1.
G-sensor connector
2.
G-sensor terminal function
NoFunction1Signal2Ground3Power(5V)
3.
Circuit diagram ...
 Lower Arm Repair procedures
Removal
[Front Lower Arm]
Replacement the lateral arm
1.
Removal the front wheel & tire.
Tightening torque :
90.0 ~ 110.0 N.m(9.0 ~ 11.0 kgf.m, 65.0 ~ 80.0 lb-ft)
2.
Disconnect ...
See also:
Vapor hose and fuel filler cap
The vapor hose and fuel filler cap should be inspected at those intervals specified
in the maintenance schedule. Make sure that a new vapor hose or fuel filler cap
is correctly replaced. ...
Shift Lever Repair procedures
Removal
1.
Remove the center console.
(Refer to Body - " Floor Consol")
2.
Disconnect the sports mode connector (A).
3.
Remove the shift cable assembly (A) from the shift lever assembl ...
Compressor Schematic Diagrams
Circuit diagram
1.
Air compressor connector
[Motor power connector (A)][Exhaust valve connector (B)][Temperature sensor connector (C)]
2.
Air compressor terminal function
[Motor power]
...
Categories
Hyundai Equus Manuals

© 2011-2026 Copyright www.heqmanual.com