Air Strut Assembly
| • |
Before replacing the relevant parts, use GDS equipment to fully discharge the air from the relevant parts.
(Refer to Air Suspension System - "Repair procedures (Air Injection Procedure)") |
| • |
This system combines a sensor and electronic parts with
mechanical components, so be careful not to subject the system to strong
impacts. |
| • |
If any pins are visible inside the electric signaling connector, do not expose it to water. |
| • |
DO NOT move any parts by their electric wires. The weight of the part could damage the wire. |
| • |
When removing an air strut, remove the air connector before proceeding with any other work. |
| • |
Note that the connector section of the damper is composed of fragile plastic. |
| • |
Be careful not to damage the damper cable with sharp objects.
Damaging the cable may adversely affect the performance of the damper. |
| • |
DO NOT hold the gaiter or the cable when loading or moving the front wheel strut. |
| • |
Make sure that the orientation of the upper and lower part does not twist during assembly. |
| • |
Check the cleanliness of each part after it is moved. (check for any foreign substances). |
| • |
Ensure that the air injection connector includes a cap that prevents the introduction of foreign substances. |
| • |
Pay attention to the installation angle of the upper arm during assembly. |
| • |
When replacing an air strut, check the new strut for air. To
this end, measure the length of the air strut to ensure that it exceeds
645 mm. If it is less than 645 mm, DO NOT use the product. |
|
| 1. |
Removal the front wheel & tire.
Tightening torque :
90.0 ~ 110.0 N.m(9.0 ~ 11.0 kgf.m, 65.0 ~ 80.0 lb-ft)
|
|
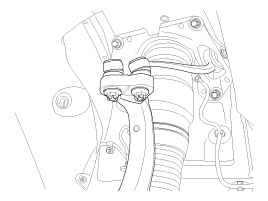
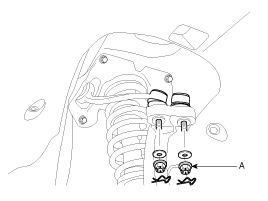
| 2. |
Disconnect the air hose (A). 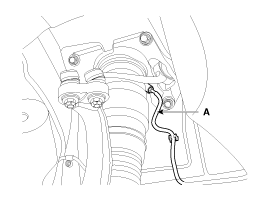
|
| 3. |
Disconnect the connector. 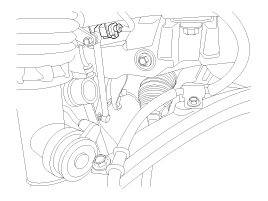
|
| 4. |
Disconnect the stabilizer link (A) from the front strut assembly by loosening the nuts.
Tightening torque :
100.0 ~ 120.0 N.m(10.0 ~ 12.0 kgf.m, 72.0 ~ 87.0 lb-ft)
|
|
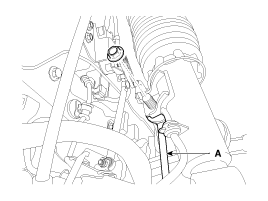
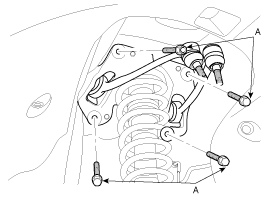
| 5. |
Disconnect the front strut assembly from the front lower arm (A) by loosening the bolt & nut.
Tightening torque :
140.0 ~ 160.0N.m(14.0 ~ 16.0kgf.m, 101.0 ~ 116.0 lb-ft)
|
|
| 6. |
Remove the split pin and castle nuts.
Tightening torque :
80.0 ~ 90.0 N.m(8.0 ~ 9.0 kgf.m, 58.0 ~ 65.0 lb-ft)
|
|
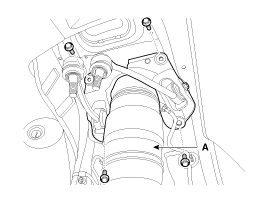
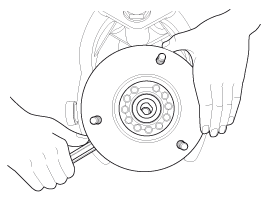
| 7. |
Disconnect the front upper arm (A) from the knuckle using a SST (09568-2J100). 
|
| 8. |
Disconnect the front strut assembly (A) from the frame by loosening the mounting bolt.
Tightening torque :
55.0 ~ 65.0 N.m(5.5 ~ 6.5 kgf.m, 40.0 ~ 47.0 lb-ft)
|
|
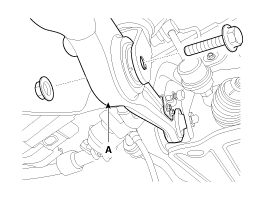
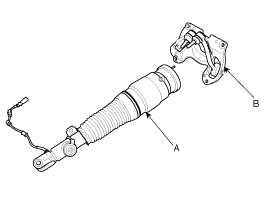
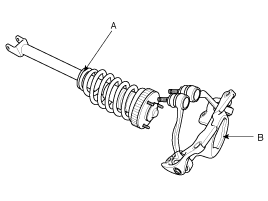
| 9. |
Disconnect the bracket (B) from the front strut assembly (A) loosening the nuts.
Tightening torque :
20.0 ~ 30.0 N.m(2.0 ~ 3.0 kgf.m, 14.0 ~ 22.0 lb-ft)
|
|
| 10. |
Installation is the reverse of removal.
| • |
Take care not toe twist upper and lower. |
| • |
After transportaion, check the cleanliness. |
| • |
Check the cap which prevents entering foreigh materials on the connector of air filling protion. |
| • |
Keep in mind in upper arm installing angle. |
|
|
Front Strut Assembly
| 1. |
Remove the front wheel & tire.
Tightening torque:
90.0 ~ 110.0 N.m (9.0 ~ 11.0 kgf.m, 65.0 ~ 80.0 lb-ft)
|
|
| 2. |
Disconnect the stabilizer link with the front strut assembly by loosening the nuts (A).
Tightening torque:
100.0 ~ 120.0N.m (10.0 ~ 12.0 kgf.m, 72.0 ~ 87.0 lb-ft)
|
|
| 3. |
Disconnect the front strut assembly (C) with the front lower arm by loosening the bolt & nuts (B).
Tightening torque:
140.0 ~ 160.0N.m(14.0 ~ 16.0kgf.m, 101.0 ~ 116.0lb-ft)
|
|
| 4. |
Remove the split pin and castle nuts (A).
Tightening torque:
80.0 ~ 90.0 N.m (8.0 ~ 9.0 kgf.m, 58.0 ~ 65.0 lb-ft)
|
|
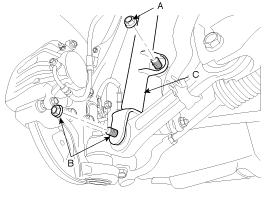
| 5. |
Disconnect the front upper arm (A) with the knuckle using a SST (09568-2J100). 
|
| 6. |
Disconnect the front strut assembly with the frame by loosening the mounting bolt (A).
Tightening torque:
55.0 ~ 65.0 N.m (5.5 ~ 6.5 kgf.m, 40.0 ~ 47.0 lb-ft)
|
|
| 7. |
Disconnect the bracket (B) with the front strut assembly (A) loosening the nuts.
Tightening torque:
20.0 ~ 30.0 N.m (2.0 ~ 3.0 kgf.m, 14.0 ~ 22.0 lb-ft)
|
|
| 8. |
Installation is the reverse of removal. |
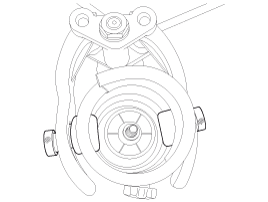
| 1. |
Compress the coil spring with a strut spring compressor. Do not compress the spring more than necessary. |
| 2. |
Disconnect the cover (A) remove the lock nut (B).
Tightening torque:
24.5 ~ 29.4 N.m (2.5 ~ 3.0 kgf.m, 14.5 ~ 18.1 lb-ft)
|

|
| 3. |
Gradually turn the bolt on the spring compressor to slowly
release the tension from the spring. Then, disconnect the components. |
| 4. |
Reassembly is the reverse of the disassembly.
| • |
Do not reuse the self locking nut. |
| • |
Set the hook with bilateral symmetry and the press the coil spring. |
| • |
The centerline of shock absorber is not aligned with coil spring, push the shock absorber to align the centerline. |
|
|
| 1. |
Check the components for damage or deformation. |
| 2. |
Compress and extend the piston rod and check that there is no abnormal resistance or unusual sound during operation. |
| 3. |
When disposing the shock absorber, fully extend the piston
rod (A) and then drill a hole on the B section to discharge gas from the
cylinder.
|
The gas coming out is harmless, but be careful of chips that
may fly when drilling. Be sure to wear safety goggles or eye protection
when performing this task. 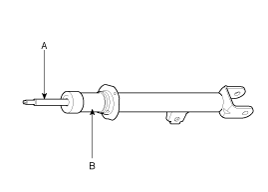
|
|
Variable damper (CDC) failure criterion
ConditionsPhenomenaMaintenance considerationsMechanical conditionsLeaking oilAn oil leak indicates that the part has failed and must be replaced.Inner seam ...
Components
1. Sub frame2. Rear shock absorber3. Air spring4. Rear upper arm5. Assist arm6. Trailing arm
...
 Hyundai Equus: Front Air Strut Assembly Repair procedures
Second generation VI (2009–2026) / Hyundai Equus VI 2009-2026 Service Manual / Suspension System / Air Suspension System / Front Air Strut Assembly Repair procedures
Hyundai Equus: Front Air Strut Assembly Repair procedures
Second generation VI (2009–2026) / Hyundai Equus VI 2009-2026 Service Manual / Suspension System / Air Suspension System / Front Air Strut Assembly Repair procedures


 Front Air Strut Assembly Troubleshooting
 Rear Variable Damper Components and Components Location