 Hyundai Equus: Smart Cruise Control Switch Repair procedures
Second generation VI (2009–2026) / Hyundai Equus VI 2009-2026 Service Manual / Engine Electrical System / Smart Cruise Control System / Smart Cruise Control Switch Repair procedures
Hyundai Equus: Smart Cruise Control Switch Repair procedures
Second generation VI (2009–2026) / Hyundai Equus VI 2009-2026 Service Manual / Engine Electrical System / Smart Cruise Control System / Smart Cruise Control Switch Repair procedures
Second generation VI (2009–2026) / Hyundai Equus VI 2009-2026 Service Manual / Engine Electrical System / Smart Cruise Control System / Smart Cruise Control Switch Repair procedures
| Inspection |
| [Measuring Resistance] |
| 1. |
Disconnect the cruise control switch connector from the control switch.
|
| 2. |
Measure resistance between terminals on the control switch when each function switch is ON (switch is depressed).
|
| 3. |
If not within specification, replace switch. |
| [Measuring Voltage] |
| 1. |
Connect the cruise control switch connector to the control switch.
|
| 2. |
Measure voltage between terminals on the harness side connector when each function switch is ON (switch is depressed).
|
| 3. |
If not within specification, inspect the control switch resistance.
The measuring resistance value is not within specification, replace the switch and measure the voltage again. |
| 4. |
If resistance is OK but, measuring voltage is not within
specification, inspect the wiring harness and connectors between the
switch and the ECM. |
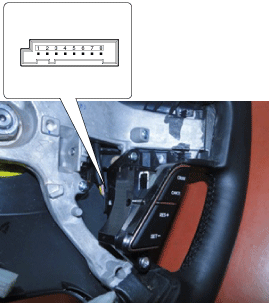
| Removal |
| 1. |
Turn ignition switch OFF and disconnect the negative (-) battery cable. |
| 2. |
Remove the air-bag module from the steering wheel.
(Refer to Restraint - "Driver Airbag (DAB) Module and Clock Spring") |
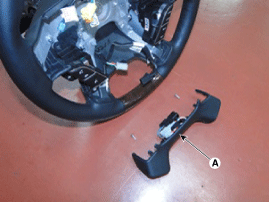
| 3. |
Remove the bejel (A) after loosening the screw.
|
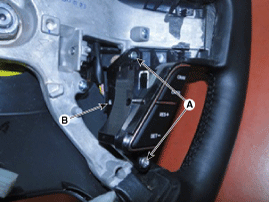
| 4. |
Remove the cruise control switch mounting screws (A). |
| 5. |
Disconnect the under cruise control switch (B).
|
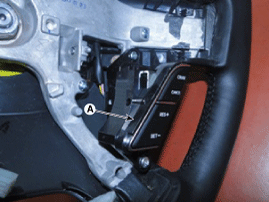
| 6. |
Remove the cruise control switch (A).
|

| Installation |
| 1. |
Install in the reverse order of removal. |
 Smart Cruise Control Switch Schematic Diagrams
Circuit Diagram
...

See also:
Smart Key Repair procedures
Smart Key
Battery Inspection
1.
Check that the red light flickers when the door lock or unlock button is pressed on the transmitter.
2.
Remove the battery (A) and check voltage if the red lig ...
Specifications
Specifications
Front Suspension
ItemSpecificationSuspension typeMulti linkShock absorberTypeManualHPD (High Perfermence Damper)AIRCDC (Continuous Damping Control)Coil springFree Height [I.D. colo ...
Rain Sensor Repair procedures
Removal
The dust or foreign substance on the rain sensor have a bad
effect upon the rain sensor capability,so protect the sensor surface
with protection cover until instal ...
Categories
Hyundai Equus Manuals

© 2011-2026 Copyright www.heqmanual.com