>

Hyundai Equus: Heater & A/C Control Unit Repair procedures - Controller - Heating, Ventilation and Air Conditioning - Hyundai Equus VI 2009-2024 Service ManualHyundai Equus: Heater & A/C Control Unit Repair procedures

Self Diagnosis
1.
Self-diagnosis process

2.
How to read self-diagnostic code
After the display panel blinks three times every 0.5 second, the corresponding fault code blinks on the setup temperature display panel every 0.5 second and will show two figures. Codes are displayed in numerical format
Fault code
Fault Code
Control Unit
Fail Description
0
Normal
11
In-car temperature sensor open
12
In-car temperature sensor short 
13
Ambient temperature sensor open 
14
Ambient temperature sensor short 
17
Evaporator temperature sensor open 
18
Evaporator temperature sensor short 
19
Temp door potentiometer open/short (Driver's side)
20
Temperature door potentiometer motor (Driver's side)
21
Mode door potentiometer open/short
22
Mode door potentiometer motor
23
Auto defogging sensor open
24
Auto defogging sensor short
25
Intake door potentiometer open/short
26
Intake door potentiometer motor
27
AQS sensor open
28
AQS sensor short
31
AQS sensor fault
32
Temperature door potentiometer open/short (Passenger's side)
33
Temperature door potentiometer motor (Passenger's side)
34
Console temperature door potentiometer open/short
35
Console temperature door potentiometer motor
36
Console temperature door A potentiometer open/short
37
Console temperature door A potentiometor motor
38
Console duct actuator open/short
39
Console duct actuator motor
43
Auto defogging potentiometer open/short
44
Auto defogging potentiometer motor
45
APT (A/C Pressure Transducer) CAN signal fault
47
RPM CAN signal fault
48
Vehicle speed CAN signal fault
49
Engine coolant temperature CAN signal fault
50
Cluster ion generator fault
51
Rear in-car temperarture sensor open
52
Rear in-car temperarture sensor short
53
Console duct sensor open
54
Console duct sensor short
55
Cool & Warm box - Thermistor fault
56
Cool & Warm box - Peltier fault
57
Cool & Warm box - Fan pressure fault
58
Cool & Warm box - Fan locking
59
Cool & Warm box - Fan fault

3.
Fault code display
(1)
Continuance operation : None or one DTC code.

(2)
Continuance operation : Two or more DTC code.

(3)
STEP operation
A.
Nomal or one fault code is same as a continuance operation.
B.
Two or more DTC code.

4.
If fault codes are displayed while checking, inspect for malfunction causes by referring to the fault code table.
5.
Fail Safe
No.
Sensor and Signal
Fail Safe Function
1
In-car sensor
25°C (77°F)
2
Rear in-car sensor
25°C (77°F)
3
Ambient temperature sensor
20°C (68°F)
(Screen: "---" °C or "---°F")
4
Auto defogging sensor
(Relative humidity)
Humidity :  0%
5
Cluster ion generator
-
6
Evaporator temperature sensor
-2°C (28.4°F)
7
AQS sensor
-
8
Electric control valve (ECV)
-
9
Vehicle speed (VS)
0 kph
10
Vehicle speed (VS) - TCU
0 kph
11
Engine Speed
650 RPM
12
Error-engine speed signal
650 RPM 
13
Throttle position signal
0%
14
Engine coolant temperature
-2°C (28.4°F)
15
Max torque limitation of A/C compressor
0 Nm
16
APT sensor output value
0 hPa
17
Activation of air conditioner compressor relay
-
18
Engine idle target speed
-
19
Console duct sensor
-

No.
Actuator
Fail Safe Function
1
Temperature control actuator feedback
Setting temperature is 24.5°C (76.1°F) or below : Max cool
Setting temperature is 25.0°C (77°F) or above : Max hot
2
Mode control actuator feedback
Vent: Vent
Others: Defrost
3
Intake actuator feedback
Recirculation: Recirculation
Others: Fresh
4
Auto defogging actuator feedback
Vent and B/L : Close 
Others : Open 
5
Console temperature control actuator
Setting temperature is 24.5°C (76.1°F) or below : Max cool
Setting temperature is 25.0°C (77°F) or above : Max hot
6
Console temperature control actuator A feedback
Setting temperature is 24.5°C (76.1°F) or below : Max cool
Setting temperature is 25.0°C (77°F) or above : Max hot
7
Console duct actuator feedback
Vent: Vent
Others: Floor

x For more information, refer to the DTC guide.
Replacement
   
Put on gloves to protect your hands.
   
Use a plastic panel removal tool to remove interior trim pieces to protect from marring the surface.
Take care not to bend or scratch the trim and panels.
1.
Disconnect the negative (-) battery terminal.
2.
Using a screwdriver or remover, remove the cluster fascia upper panel (A).

3.
Using a screwdriver or remover, remove the center fascia upper panel (A).

4.
Disconnect the heater and A/C controller connector (A), incar sensor connector (B), and clock/engine start stop button connector (C).

5.
Remove the mounting srcews, and then separate the heater and A/C controller (A).

6.
Install in the reverse order of removal.
   
Make sure the connector is connected properly.
Replace any damage clips.
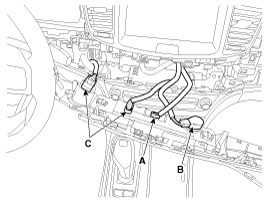
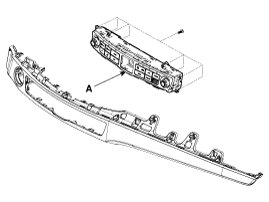
    Heater & A/C Control Unit Components and Components Location
    Component Connector Pin Function Pin No.Connector A Function1Ground2Rheostat (Illumination -)3Rear Defog Switch4-5Detent Out (+)6HTD 7Illumination + (Tail)8-9Ground10-11Climate CAN High12 ...

    Heater Control Unit Components and Components Location
    Control Panel Component Connector Pin Function Pin No.Connector AConnector B1GroundIgnition 22-FET (Gate)3Mode Control Actuator (Vent)FET (Drain Feedback)4Mode Control Actuator (Defrost)Sen ...

    See also:

    Front Air Strut Assembly Troubleshooting
    Variable damper (CDC) failure criterion ConditionsPhenomenaMaintenance considerationsMechanical conditionsLeaking oilAn oil leak indicates that the part has failed and must be replaced.Inner seam ...

    License plate lamp replacement
    1.Open the trunk. 2.Disconnect the negative battery cable. 3.Using a screwdriver, remove the trunk lid latch cover(1). 4.Using a screwdriver, remove the trunk lid switch(2), and disconnect ...

    Closing the hood
    1. Before closing the hood, check the following: All filler caps in engine compartment must be correctly installed. Gloves, rags or any other combustible material must be removed from the eng ...

    Categories

    Hyundai Equus Manuals


    © 2011-2024 Copyright www.heqmanual.com