 Hyundai Equus: Front Washer Motor Repair procedures
Second generation VI (2009–2026) / Hyundai Equus VI 2009-2026 Service Manual / Body Electrical System / Windshield Wiper/Washer / Front Washer Motor Repair procedures
Hyundai Equus: Front Washer Motor Repair procedures
Second generation VI (2009–2026) / Hyundai Equus VI 2009-2026 Service Manual / Body Electrical System / Windshield Wiper/Washer / Front Washer Motor Repair procedures
Second generation VI (2009–2026) / Hyundai Equus VI 2009-2026 Service Manual / Body Electrical System / Windshield Wiper/Washer / Front Washer Motor Repair procedures
| Removal |
|

| 1. |
Disconnect the negative (-) battery terminal. |
| 2. |
Remove the front bumper cover.
(Refer to Body - "Front Bumper") |
| 3. |
Remove the front head lamp assembly.
(Refer to Lighting System / Head Lamp) |
| 4. |
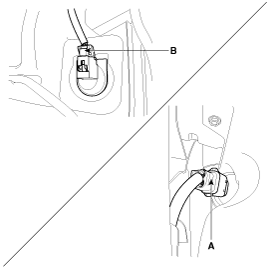
Remove the washer hose and the washer motor connector (A) and the washer fluid level sensor connector (B).
|
| 5. |
Remove the washer reservoir 2 bolts.
|

| 6. |
Remove the mounting bolts of air suspension reserive tank
under the washer reserive in order to make easier to remove washer tank.
But, do not disconnect air hose.
(Refer to Suspension - "Front Suspension System") |
| 7. |
Remove the washer reserior after loosening the mounting bolt from the lower and of washer reserivor |
| Inspection |
Front Washer Motor
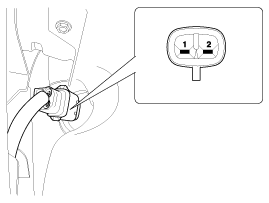
| 1. |
With the washer motor connected to the reservoir tank, fill the reservoir tank with water.
|

| 2. |
Connect positive (+) battery cables to terminal 2 and negative (-) battery cables to terminal 1 respectively. |
| 3. |
Check that the motor operates normally and the washer motor runs and water sprays from the front nozzles. |
| 4. |
If they are abnormal, replace the washer motor.
(Connector NO.1 : Windshield washer (+), 2: Ground)
|
Washer Fluid Level Sensor Switch
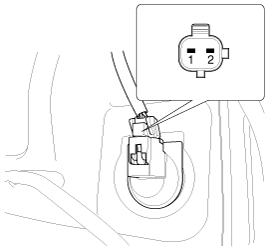
| 1. |
Disconnect the negative(-) battery terminal. |
| 2. |
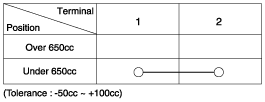
Drain the washer fluid less than 650 cc. |
| 3. |
Check for continuity between the No. 1 and No.2 terminal in each float position.
There should be continuity when the float is down.
There should be no continuity when the folat is up. |
| 4. |
If the continuity is not as specified, replace the washer fluid level switch
|
Head Lamp Washer Motor
| 1. |
With the washer motor connected to the reservoir tank, fill the reservoir tank with water.
|
| 2. |
Connect positive (+) battery cables to terminal 2 and negative (-) battery cables to terminal 1 respectively. |
| 3. |
Check that the motor operates normally and the washer motor runs and water sprays from the head lamp nozzles. |
| 4. |
If they are abnormal, replace the washer motor. |
| Installation |
| 1. |
Install the washer reservoir.
|
| 2. |
Install the washer motor hose and connectors. |
| 3. |
Install the air suspension reserve tank bolts. |
| 4. |
Install the head lamp assembly. |
| 5. |
Install the front bumper cover. |
 Front Wiper Motor Repair procedures
Removal
1.
Remove the windshield wiper arm (A) and blade after removing a nut.
Tightening torque :
27 ~ 31 N.m (2.8 ~ 3.2 kgf.m, 20 ~ 23 lb-ft)
2.
If necessary of removing the wiper blad ...
 Rain Sensor Components and Components Location
Components and Components Location
1. Horizontal light sensor2. Vertical light sensor3. Solar load sensor4. Rain sensor - left5. Rain sensor - right
...
See also:
Description and Operation
Description
Tread Lamp
-
Tire Under Inflation / Leak Warning.
1.
Turn on condition
A.
When tire pressure is below allowed threshold
B.
When rapid leak is detected by the sensor.
2 ...
AFLS (Adaptive Front Lighting System) (if equipped)
Adaptive front lighting system uses the steering angle and vehicle speed, to
keep your field of vision wide by swiveling and leveling the headlamp. Turn the
knob to the AUTO position when the ...
Heated Oxygen Sensor (HO2S) Repair procedures
Inspection
1.
Turn the ignition switch OFF.
2.
Disconnect the HO2S connector.
3.
Measure resistance between the HO2S terminals 3 and 4.
4.
Check that the resistance is within the speci ...
Categories
Hyundai Equus Manuals

© 2011-2026 Copyright www.heqmanual.com