 Hyundai Equus: Rear Pillar Trim Repair procedures
Second generation VI (2009–2026) / Hyundai Equus VI 2009-2026 Service Manual / Body (Interior and Exterior) / Interior Trim / Rear Pillar Trim Repair procedures
Hyundai Equus: Rear Pillar Trim Repair procedures
Second generation VI (2009–2026) / Hyundai Equus VI 2009-2026 Service Manual / Body (Interior and Exterior) / Interior Trim / Rear Pillar Trim Repair procedures
Second generation VI (2009–2026) / Hyundai Equus VI 2009-2026 Service Manual / Body (Interior and Exterior) / Interior Trim / Rear Pillar Trim Repair procedures
| Replacement |
|

|

| 1. |
Remove the rear seat cushion assembly.
(Refer to Rear Seat - "Rear Seat Assembly") |
| 2. |
Remove the rear seat back assembly.
(Refer to Rear Seat - "Rear Seat Assembly") |
| 3. |
Remove the rear door scuff trim.
(Refer to Interior Trim - "Door Scuff Trim") |
| 4. |
Slighty remove the rear door body side weatherstrip. |
| 5. |
Remove the rear wheel house trim.
(Refer to Interior Trim - "Rear Wheel House Trim") |
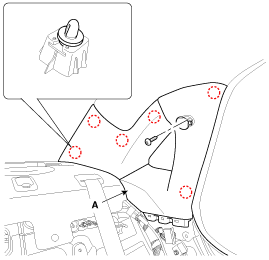
| 6. |
Using a screwdriver or remover, remove the rear pillar trim (A).
|
| 7. |
Install in the reverse order of removal.
|

 Rear Pillar Trim Components and Components Location
Component Location
1. Rear pillar trim
...
 Rear Wheel House Trim Components and Components Location
Component Location
1. Rear wheel house trim
...
See also:
Smart Cruise Control Switch Schematic Diagrams
Circuit Diagram
...
Symbols used in this manual
Warnings, cautions and Notices
WARNING
A WARNING indicates a situation in which harm, serious bodily injury or death
could result if the warning is ignored.
CAUTION
A CAUTION indicates a situat ...
Cool and Warm Box Description and Operation
Description
Cool and warm box is a compartment where you can keep items cool or warm.
The sytem is a enviromentally friendly system that operates independently from the heater and A/C system.
...
Categories
Hyundai Equus Manuals

© 2011-2026 Copyright www.heqmanual.com