 Hyundai Equus: Main Crash Pad Assembly Repair procedures
Second generation VI (2009–2026) / Hyundai Equus VI 2009-2026 Service Manual / Body (Interior and Exterior) / Crash Pad / Main Crash Pad Assembly Repair procedures
Hyundai Equus: Main Crash Pad Assembly Repair procedures
Second generation VI (2009–2026) / Hyundai Equus VI 2009-2026 Service Manual / Body (Interior and Exterior) / Crash Pad / Main Crash Pad Assembly Repair procedures
Second generation VI (2009–2026) / Hyundai Equus VI 2009-2026 Service Manual / Body (Interior and Exterior) / Crash Pad / Main Crash Pad Assembly Repair procedures
| Replacement |
|

|

| 1. |
Remove the front pillar trim.
(Refer to Interior Trim - "Front Pillar Trim") |
| 2. |
Remove the cowl side trim.
(Refer to Interior Trim - "Cowl Side Trim") |
| 3. |
Remove the front LCD monitor.
(Refer to Body Electrical System - "Front LCD Monitor") |
| 4. |
Remove the AVN head unit.
(Refer to Body Electrical System - "AVN Head Unit") |
| 5. |
Remove the instrument cluster.
(Refer to Body Electrical System - "Instrument Cluster") |
| 6. |
Remove the crach pad center panel.
(Refer to Crash Pad - "Crach Pad Center Panel") |
| 7. |
Remove the steering wheel.
(Refer to Steering System - "Steering Wheel") |
| 8. |
Remove the multifunction switch assembly.
(Refer to Body Electrical System - "Multifunction Switch") |
| 9. |
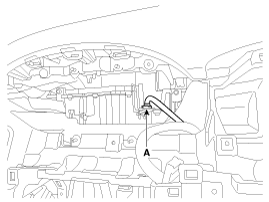
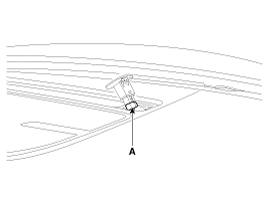
Disconnect the head up display (HUD) unit connector (A).
|
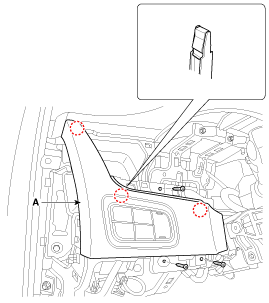
| 10. |
After loosening the mounting screws, then remove the crash pad upper panel [LH] (A).
|
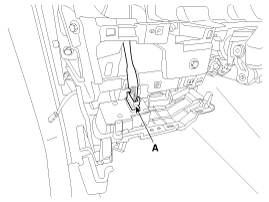
| 11. |
Disconnect the crash pad upper panel switch connector (A).
|
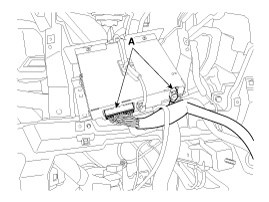
| 12. |
After loosening the mounting screws, then remove the cubis unit (A).
|

| 13. |
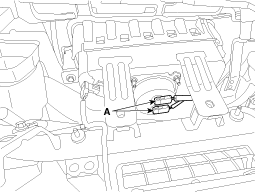
Disconnect the cubis unit connectors (A).
|
| 14. |
Disconnect the photo sensor connector (A).
|
| 15. |
Disconnect the center speaker connector (A).
|
| 16. |
Loosen the mounting bolts. |
| 17. |
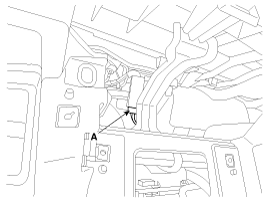
Disconnect the passenger's airbag connectors (A).
|
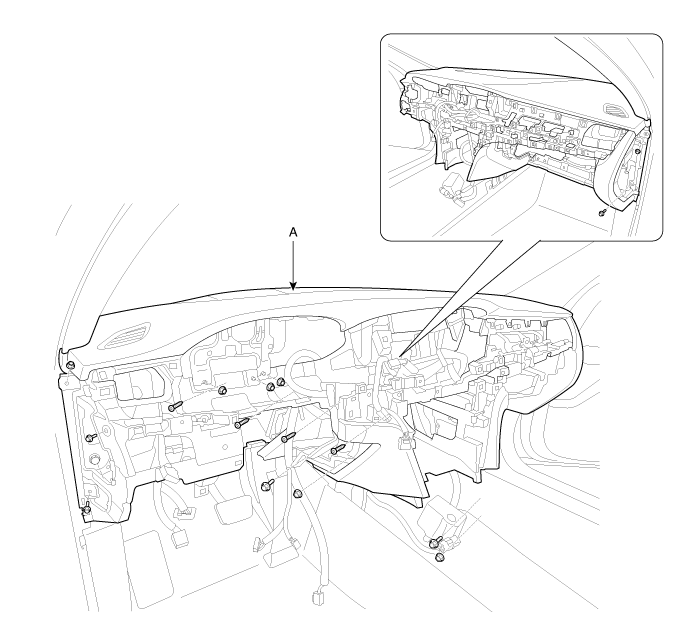
| 18. |
After loosening the mounting bolts and nuts, then remove the main crash pad assembly (A).
|
| 19. |
Install in the reverse order of removal.
|

 Main Crash Pad Assembly Components and Components Location
Component Location
1. Main crash pad assembly
...
 Cowl Cross Bar Assembly Components and Components Location
Component Location
1. Cowl cross bar assembly
...
See also:
Description and Operation
Description
EHPS uses an electromotor to assist you in steering the
vehicle. It senses the vehicle speed and road condition.If the engine is
off or if the power steering system becomes inoperat ...
Climate Control Air Filter Description and Operation
Description
The climate control air filter is located in the blower unit.
It eliminates foreign materials and odor. The particle filter performs a
role as an odor filter as well as a conventio ...
Troubleshooting
Troubleshooting
Ignition System
SymptomSuspect AreaRemedyEngine will not start or is hard to start (Cranks OK)Ignition lock switchInspect ignition lock switch, or replace as requiredIgnition c ...
Categories
Hyundai Equus Manuals

© 2011-2026 Copyright www.heqmanual.com