 Hyundai Equus: Crach Pad Center Panel Repair procedures
Second generation VI (2009–2026) / Hyundai Equus VI 2009-2026 Service Manual / Body (Interior and Exterior) / Crash Pad / Crach Pad Center Panel Repair procedures
Hyundai Equus: Crach Pad Center Panel Repair procedures
Second generation VI (2009–2026) / Hyundai Equus VI 2009-2026 Service Manual / Body (Interior and Exterior) / Crash Pad / Crach Pad Center Panel Repair procedures
Second generation VI (2009–2026) / Hyundai Equus VI 2009-2026 Service Manual / Body (Interior and Exterior) / Crash Pad / Crach Pad Center Panel Repair procedures
| Replacement |
|

|

| 1. |
Remove the floor console assembly.
(Refer to Floor Console - "Floor Console Assembly") |
| 2. |
Remove the center fascia lower tray.
(Refer to Crash Pad - "Center Fascia Panel") |
| 3. |
Remove the AVN head unit.
(Refer to Body Electrical System - "AVN Head Unit") |
| 4. |
Remove the cluster fascia panel.
(Refer to Crash Pad - "Cluster Fascia Panel") |
| 5. |
Remove the crash pad lower panel.
(Refer to Crash Pad - "Crash Pad Lower Panel") |
| 6. |
Remove the glove box housing.
(Refer to Crash Pad - "Glove Box Housing") |
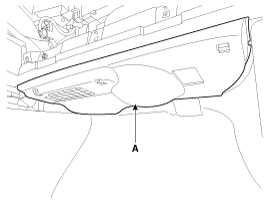
| 7. |
To remove the crash pad under cover [RH] (A), press both
sides of the locking pin and then pull it down in the direction of the
arrow.
|
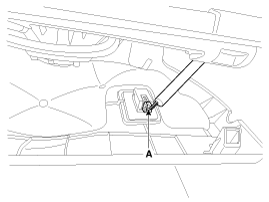
| 8. |
Disconnect the under lamp connector (A).
|
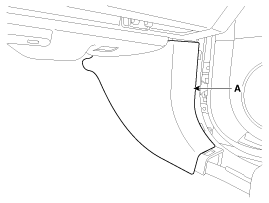
| 9. |
Remove the luggage trim[RH] (A).
|
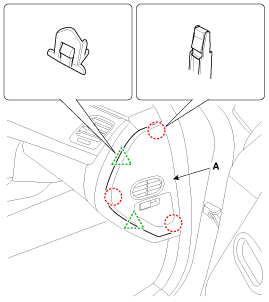
| 10. |
Using a screwdriver or remover, remove the crash pad side cover [RH] (A).
|
| 11. |
After loosening the mounting screws, bolts, nuts, then remove the crash pad center panel (A).
|

| 12. |
Install in the reverse order of removal.
|

 Crach Pad Center Panel Components and Components Location
Component Location
1. Crash pad center panel
...
 Main Crash Pad Assembly Components and Components Location
Component Location
1. Main crash pad assembly
...
See also:
Specifications
Specifications
ItemsSpecificationHoodTypeRear hinged, gas lifter typeFront DoorConstructionFront hinged, full door constructionRegulator systemWire drum typeLocking systemPin-fork systemRear Door ...
If engine stalls while driving
1.Reduce your speed gradually, keeping a straight line. Move cautiously off the
road to a safe place.
2.Turn on your emergency flashers.
3.Try to start the engine again. If your vehicle will not s ...
Compressor Components and Components Location
Components
1. Center Bolt2. Hub Bolt3. Hub Assembly4. Snap Ring5. Pulley6. Compressor Assembly
...
Categories
Hyundai Equus Manuals

© 2011-2026 Copyright www.heqmanual.com